Kubernetes Deployments: A Complete Guide

Oct 2, 2023
|
19
min Read
According to the Cloud Native Computing Foundation (CNCF), 96% of organizations use or evaluate Kubernetes, demonstrating its dominance in container orchestration. When exploring Kubernetes, one of the first things you'll encounter is Kubernetes deployment types.
These deployments help manage your application's state by automating the number of instances running. For example, you can always set a rule to keep three instances running, and Kubernetes ensures this happens even if one instance fails, restarting it automatically. This process streamlines application management and ensures consistent uptime and availability in any Kubernetes environment.
By the end of this article, you'll understand:
A Kubernetes deployment acts as a manager for your application pods, ensuring that the pods run as you've specified. When you set up a deployment, you give Kubernetes a model of how you want your app to look.
This model includes details like which container image from Docker Hub to use, how many pod replicas to run, and other configuration specifics. This process allows Kubernetes deployment tools to handle all operational needs and corrections automatically.
Deployments remain proactive by ensuring that if a node or pod goes down, Kubernetes deployment types spin up a new pod to maintain your app's availability. Whether using rolling deployment, shadow deployment, or a more specialized bluegreen deployment, Kubernetes keeps your application operational and reliable.
Kubernetes deployments are crucial in maintaining the reliability of stateful applications by ensuring they are always available.
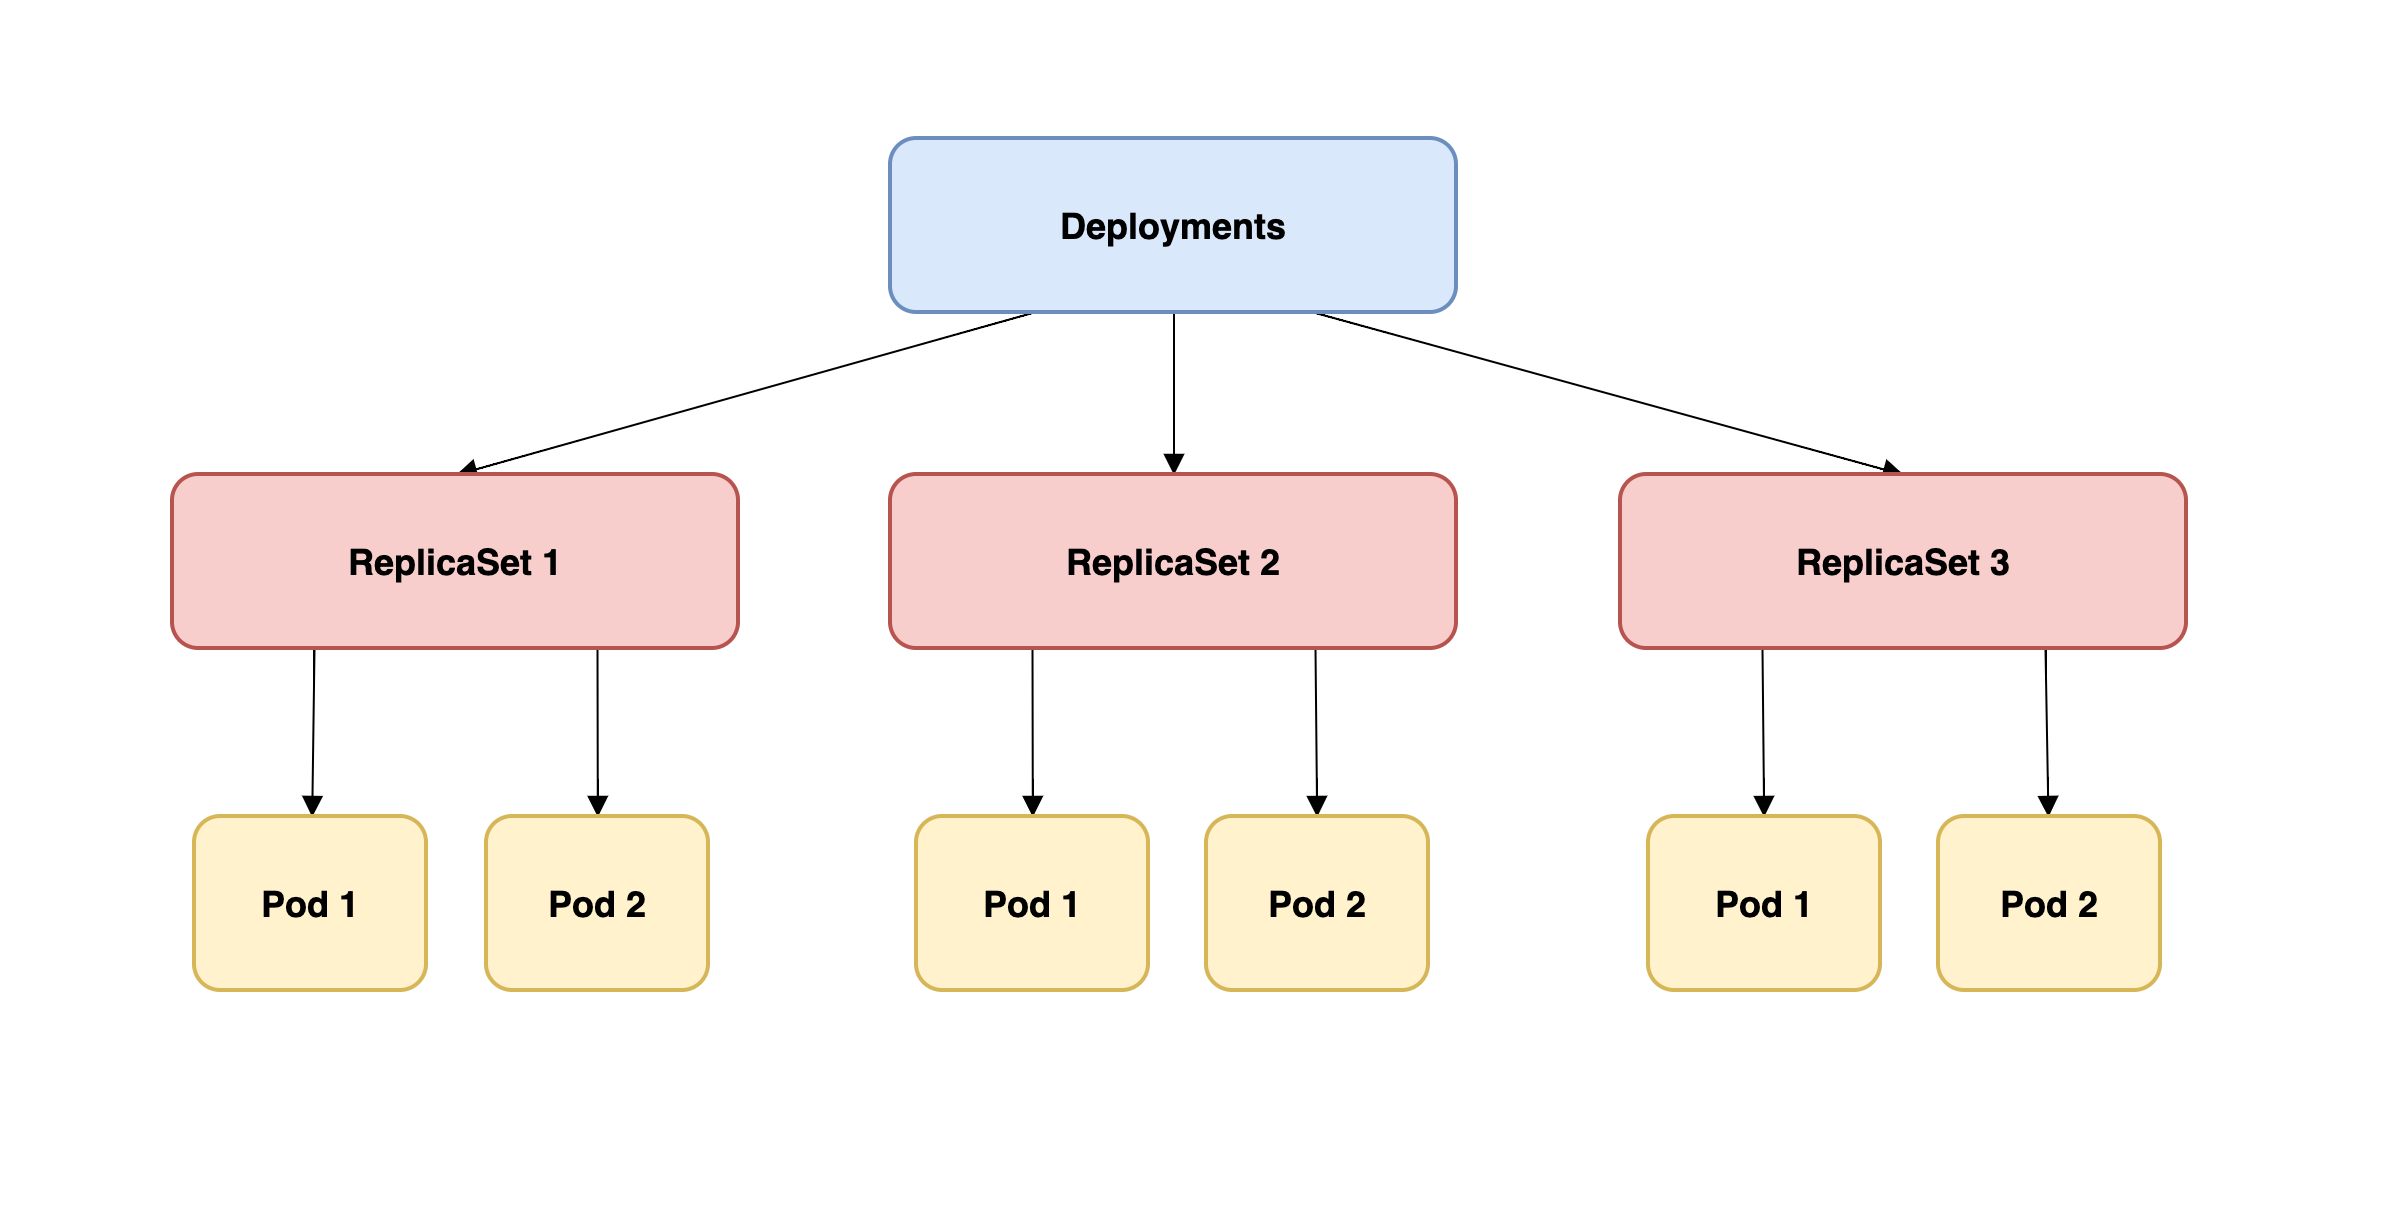
Understanding the hierarchy between kubernetes deployment types, pods, and ReplicaSets is key to mastering your application's deployment. Deployments are like top-level managers that oversee ReplicaSets, which, in turn, maintain the required number of pod replicas. When a pod fails, the new replicaset ensures another is launched, maintaining consistency in your application’s performance.
In simpler terms, deployments manage ReplicaSets, and these oversee your pods, ensuring that kubernetes deployment yaml files you create are executed properly and efficiently.
The bottom line is that deployments look after ReplicaSets, and ReplicaSets oversee pods in the Kubernetes control plane.
Kubernetes favors a "tell me what you want, and I'll handle it" approach. You specify your desired outcome, and Kubernetes works out the steps to achieve that. This approach is known as "declarative configuration."
For deployments, this might look something like:
apiVersion: apps/v1 kind: Deployment metadata: name: app-deployment spec: replicas: 3 template: metadata: labels: app: sample-app spec: containers: - name: sample-container image: sample-app-image:v1
Here, you're stating your desire: "I want three replicas of a pod running my app's image." Kubernetes takes this declaration and works behind the scenes to make it happen. You don't need to manage the individual steps; the system does it for you.
The following sections cover the four different types of Kubernetes development strategies:
The recreate strategy is straightforward. When you want to deploy a new version of your application, Kubernetes terminates the existing pods and creates new ones from the updated container image. During this period, your application will experience downtime.
Imagine you have an e-commerce website. If you use the recreate strategy to update your website to a new version, your website will go down temporarily. When the new version is up and running, users can access the updated site.
The following code is an example of how you'd implement this strategy:
apiVersion: apps/v1 kind: Deployment metadata: name: ecommerce-website spec: replicas: 3 strategy: type: Recreate template: metadata: labels: app: ecommerce-website spec: containers: - name: ecommerce-container image: ecommerce-image:v2
Rolling deployment is a kubernetes deployment strategy that ensures minimal downtime during updates. It replaces old pods with new ones gradually. This means some users may experience the old version while others might see the updated app. This transition reduces disruptions and ensures a smooth update process.
The process is controlled by the maxUnavailable and maxSurge fields in the yaml file. They ensure that availability and performance are maintained. Unlike the bluegreen deployment, a rolling deployment provides continuous availability without needing two environments.
Consider the same e-commerce website. With a rolling update, as users browse products, some might see the old version of a product page while others see the new version. The transition is smooth, and there's no noticeable downtime.
The following is an example of this strategy:
apiVersion: apps/v1 kind: Deployment metadata: name: ecommerce-website spec: replicas: 3 strategy: type: RollingUpdate rollingUpdate: maxUnavailable: 1 maxSurge: 1 template: metadata: labels: app: ecommerce-website spec: containers: - name: ecommerce-container image: ecommerce-image:v2
In the rolling update, the fields maxUnavailable and maxSurge are crucial for understanding how the process works.maxUnavailable sets the maximum number of unavailable pods during an update. For example, setting it to 1 means only one pod can be down at a time during the update.
maxSurge specifies the maximum number of extra pods that can be created during the update over the desired number of pods. If set to 1, Kubernetes can create one additional pod during the update.
These settings provide precise control over application availability during updates, balancing speed and stability as needed. They mitigate deployment risks. For even more control, strategies like blue/green deployments can be used.
A bluegreen deployment strategy creates two identical environments: blue, running the current version, and green, running the updated one. Once the new version in the green environment is tested, traffic is switched over seamlessly from blue to green. This ensures zero downtime. This method is ideal when you want to have complete control over the transition and rollback processes.
Suppose you have a music streaming service. The "blue" environment runs the version users are currently enjoying. You develop a new feature—perhaps an AI-based music recommendation system—and deploy it to the "green" environment. After testing it extensively, you switch user traffic to "green," instantly giving everyone access to the new feature.
The following code is an example of this strategy:
# Blue deployment (current version) apiVersion: apps/v1 kind: Deployment metadata: name: music-service-blue spec: replicas: 3 selector: matchLabels: version: blue template: metadata: labels: version: blue spec: containers: - name: music-service-container image: music-service:v1---# Blue service (current version) apiVersion: v1 kind: Service metadata: name: music-service-blue spec: selector: version: blue---# Green deployment (new version) apiVersion: apps/v1 kind: Deployment metadata: name: music-service-green spec: replicas: 3 selector: matchLabels: version: green template: metadata: labels: version: green spec: containers: - name: music-service-container image: music-service:v2---# Green service (new version with no initial traffic) apiVersion: v1 kind: Service metadata: name: music-service-green spec: selector: version: green
When you're ready to switch traffic:
# Update the main service selector to route traffic to green apiVersion: v1 kind: Service metadata: name: music-service-main spec: selector: version: green
The canary deployment strategy is another popular method within kubernetes deployment types. It involves releasing the new version of your app to a subset of users (the "canaries") before scaling it out. This gradual release helps monitor performance and gather feedback to ensure that there are no critical issues before the full deployment. Tools like kubectl rollout status help manage this process, allowing fine-grained control over deployment traffic.
This incremental release strategy offers fine-grained control, enabling continuous assessment of how the new release impacts system metrics and user behavior.
Imagine you have a social media platform.
You've just developed a new, experimental feature. Instead of rolling it out to all users, you release it to just 5 percent (the "canaries"). If they engage positively and no major issues arise, you increase the rollout percentage until all users have the new feature.
The following code sample uses weighted routing with an ingress controller, like Istio or Nginx:
apiVersion: networking.k8s.io/v1 kind: Ingress metadata: name: social-media-ingress annotations: nginx.ingress.kubernetes.io/canary: "true" nginx.ingress.kubernetes.io/canary-weight: "5" spec: rules: - host: socialmedia.com http: paths: - path: / backend: serviceName: social-media-canary-service servicePort: 80
The weighted routing with an ingress in this sample is used to control the percentage of user traffic that gets directed to the new, "canary" version of your application. This granularity is crucial for canary deployments because it allows you to test the new version on a subset of your userbase before rolling it out to everyone. Ingress controllers offer a convenient way to implement this kind of traffic splitting.
Both canary and blue/green deployments require more complex configurations compared to rolling updates. For instance, with canary deployments, you might need to integrate with an ingress controller or a service mesh to manage weighted routing. Similarly, blue/green deployments often require additional operational steps to switch traffic between environments.
Regarding downtime, rolling updates aim to minimize downtime by ensuring that a certain number of pods are always available while the update happens. In contrast, while blue/green deployments can achieve zero downtime during the switch, they may experience downtime if the "green" environment has not been adequately tested.
Canary deployments, on the other hand, expose only a portion of users to potential downtime but may still negatively impact the user experience for that subset.
Deploying applications in Kubernetes can initially seem daunting, but following best practices can streamline the process and mitigate potential challenges. Always ensure Kubernetes security by implementing role-based access control (RBAC). You also try to keep Kubernetes secrets safe.
Always define your application's desired state using declarative configuration. By doing so, you allow Kubernetes to take care of the heavy lifting, ensuring your application meets the defined criteria without you micromanaging the process.
For example, instead of manually scaling the number of replicas, define the desired replicas in your deployment configuration:
apiVersion: apps/v1 kind: Deployment metadata: name: my-application spec: replicas: 5 ...
A crucial aspect of maintaining application availability is detecting and resolving issues quickly. Health checks let Kubernetes know the status of your pods and take necessary actions if they're unresponsive.
For example, liveness and readiness probes can be used to check the health of your pods:
apiVersion: v1 kind: Pod metadata: name: my-app spec: containers: - name: my-app-container image: my-app:v1 livenessProbe: httpGet: path: /healthz port: 8080 readinessProbe: httpGet: path: /readiness port: 8080
Labels and annotations are key-value pairs that you can attach to Kubernetes objects. While labels help to identify and select objects, annotations store additional metadata.
For example, you can use labels to group related pods:
apiVersion: v1 kind: Pod metadata: name: backend-pod labels: app: my-app tier: backend
Define resource requests and limits for your containers to ensure efficient utilization and to prevent any one container from consuming all available resources.
The following example sets CPU and memory usage for a container:
apiVersion: v1 kind: Pod metadata: name: resource-pod spec: containers: - name: my-container image: my-image:v1 resources: requests: memory: "64Mi" cpu: "250m" limits: memory: "128Mi" cpu: "500m"
Mistakes happen. It's important to have a plan to quickly revert a deployment if something goes wrong. Kubernetes facilitates easy rollbacks to a previous deployment version.
You can roll back a problematic deployment with the following:
kubectl rollout undo deployment/my-deployment
Scaling is essential for handling fluctuating application demands. Kubernetes deployment types offer two primary methods: horizontal scaling and vertical scaling.
Horizontal scaling increases or decreases the number of pods. It’s managed through fields like replicas in your kubernetes deployment yaml file.
Vertical scaling adjusts the resources allocated to each pod, such as CPU and memory.
Both scaling methods ensure that your application adapts to demand without compromising performance.
Horizontal scaling refers to adding or reducing the number of pods in a deployment. It's like adding more workers to handle an increased workload.
In Kubernetes, you achieve horizontal scaling through the replicas field in the deployment configuration.
You'd use the following code if you wanted to scale out your application to five replicas:
apiVersion: apps/v1 kind: Deployment metadata: name: my-app-deployment spec: replicas: 5 ...
You can also use a kubectl command:
kubectl scale deployment my-app-deployment --replicas=5
Vertical scaling involves increasing or decreasing an existing pod's resources (CPU, memory). It's akin to giving your single worker more tools or capabilities to handle a job more efficiently. While Kubernetes supports vertical scaling, it's more disruptive than horizontal scaling because it requires restarting the pod.
The following increases the CPU and memory for a pod:
apiVersion: v1 kind: Pod metadata: name: my-vertically-scaled-pod spec: containers: - name: my-container image: my-image:v1 resources: requests: memory: "256Mi" cpu: "1" limits: memory: "512Mi" cpu: "2"
When a deployment is horizontally scaled, Kubernetes ensures that the specified number of pod replicas are always running. If a pod fails, Kubernetes automatically creates a new one to maintain the desired count. This mechanism enhances fault tolerance and accommodates growing user traffic.
Vertical scaling might be more suitable for resource-intensive applications (such as databases). However, monitoring these applications closely is essential to ensure they don't max out their allocated resources, leading to potential failures or degraded performance.
In the push for more resilient and adaptable infrastructures, businesses are increasingly looking at multicluster and multicloud solutions. Both approaches have their merits and drawbacks.
Let's examine them.
In a multicluster deployment, you distribute your Kubernetes workloads across more than one cluster. This enhances isolation and allows for the geographical distribution of services, thus reducing latency. However, this setup introduces challenges like increased complexity and configuration drift.
Some of the benefits of multicluster deployments include:
Some of the challenges of multicluster deployments include:
Multicloud deployments involve distributing your Kubernetes workloads across multiple cloud providers. This approach offers the advantage of avoiding vendor lock-in and leveraging unique services from different providers. However, this flexibility comes at the cost of increased complexity and potential data transfer costs.
Here are some of the benefits of multicloud deployments:
Here are some of the challenges of multicloud deployments:
To navigate the complexities and fully leverage the benefits of multicluster and multicloud deployments, consider adopting the following strategies:
In the modern DevOps landscape, there's an increasing shift towards GitOps—a methodology where Git repositories serve as the singular source of truth for defining the desired state of applications and infrastructure.
GitOps leverages Git's versioning and collaboration capabilities to drive infrastructure and application deployments, creating a unified source of truth for both code and infrastructure configurations.
All changes are made through Git commits, with automated systems ensuring that the actual resource state matches the desired state in the Git repository. This approach treats infrastructure as code, enabling automation, code reviews, versioning, and CI/CD practices for operations workflows.
GitOps fosters collaboration between development and operations teams through pull requests, leading to quicker feedback and compliance with industry regulations.
The elegance of GitOps lies in its simplicity, as it replaces specialized tools with Git as a universal tool, reducing the learning curve and facilitating onboarding for team members familiar with Git workflows.
It transforms operations into a code-based, collaborative process, streamlining infrastructure management and deployment practices while enhancing transparency and auditability.
With its declarative approach to configurations, Kubernetes works seamlessly with GitOps principles. Here's how:
Suppose you have a deployment in Kubernetes, and its manifest is stored in a Git repository. If you want to update the image version, you simply modify the manifest in your Git repository.
Once the change is merged, Argo CD or Flux detects this change and updates the deployment in your Kubernetes cluster:
apiVersion: apps/v1 kind: Deployment metadata: template: spec: containers: - name: app-container image: my-application:v2 # Update the image version here
There are many benefits to combining Kubernetes with GitOps, and you'll learn about some of them in this section. The benefits of combining Kubernetes with GitOps include:
Even with its multitude of features and capabilities, Kubernetes is not without its challenges. This section highlights some of the typical issues DevOps engineers face and provides strategies to navigate these challenges effectively.
Kubernetes comes with a steep learning curve, with many components and concepts to understand. This can be daunting, especially for newcomers.
Mitigation:
Networking in Kubernetes, encompassing services, ingresses, and network policies, can sometimes be intricate due to a variety of factors such as complex service-to-service communication, the need for controlled access to services, and the challenges of traffic routing and load balancing. These complexities often require a nuanced understanding of Kubernetes' networking model and may involve additional tools or custom configurations to achieve desired behaviors.
Mitigation:
Security misconfigurations or overlooking best practices can leave your deployments vulnerable.
Mitigation:
Persistent storage in Kubernetes can be tricky, especially when dealing with stateful applications.
Mitigation:
When managing multiple environments, there's a risk of configurations drifting apart, leading to inconsistencies.
Mitigation:
This guide taught you about Kubernetes deployment fundamentals that enable control over application scaling and stability. You explored deployment strategies like recreate, rolling update, blue/green, and canary, each with its use cases and best practices, including declarative configurations and health checks.
You also tackled vertical and horizontal scaling challenges and provided insights into multicluster and multi-cloud deployments. Additionally, you covered GitOps integration for efficient and transparent deployments.
Staying updated and engaged with Kubernetes' evolving landscape and community is crucial for mastering its deployments and ensuring success in container orchestration. Contact us for more insights.
A Kubernetes deployment automates and streamlines the process, with the entire update managed by the Kubernetes backend.
It ensures the desired pods are consistently running and available without requiring client-side involvement.
To deploy an application on Kubernetes, it must first be packaged in a supported container format, such as Docker.
For an initial deployment, you can use a simple hello-node application. This is packaged in a Docker container and uses NGINX to respond to all incoming requests.
The setup provides a straightforward way to get started with Kubernetes deployments.
With Kubernetes, you simply declare how you want your application to run, and it takes care of the rest. This ensures everything transitions smoothly to your desired state.
You can now say goodbye to constant manual tweaks as Kubernetes handles it for you. It brings more reliability and less stress. This isn't just a win for massive enterprises; even smaller teams can tap into the power of Kubernetes deployments and boost their efficiency.
Deploy your first virtual cluster today.
