Introduction to Karpenter

Apr 28, 2026
|
13
min Read

Kubernetes autoscaling is at the heart of most cloud-native platforms. As workloads fluctuate throughout the day, clusters need to respond quickly to new scheduling pressure without wasting money on idle capacity. At a basic level, this problem has traditionally been handled by the Kubernetes Cluster Autoscaler, which adjusts node counts based on pending pods and available resources.
So that begs the question, why does Karpenter exist? While Cluster Autoscaler is proven and widely deployed, it was designed around a very specific model of infrastructure. It assumes predefined node groups, relatively static instance choices, and periodic reconciliation cycles. When teams want faster reaction times, more aggressive cost optimization, and finer control over how compute is provisioned, those assumptions can be constraining. Karpenter offers a more direct and flexible way to connect Kubernetes scheduling decisions with cloud capacity.
In this article, you'll learn what Karpenter is, why it was created, and how it differs from the traditional Cluster Autoscaler. You'll also see a practical example of Karpenter running on AWS, along with an honest look at its current limitations and where newer approaches like vCluster Auto Nodes fit into the picture.
The Kubernetes Cluster Autoscaler was a great option when clusters were smaller, infrastructure choices were more static, and scaling events were relatively infrequent. It's a dependable component and is still the default autoscaler in many managed Kubernetes offerings. However, as clusters grow in size and workloads become more dynamic, a set of structural limitations starts to surface, especially for platform teams operating at scale.
Cluster Autoscaler reacts to scheduling pressure indirectly. It watches for pods that stay pending, then periodically reconciles the cluster state to decide whether to scale a node group.
This loop-based approach introduces latency between demand appearing and capacity being provisioned. In busy clusters, those delays can translate into throttled workloads, slow rollouts, or brief service disruptions while new nodes are coming online. The autoscaler eventually catches up, but not always fast enough for bursty or latency-sensitive workloads.
Scaling with Cluster Autoscaler is tightly coupled to predefined node groups. Each group must be configured in advance with specific instance types, sizes, zones, and scaling limits.
As application requirements diversify, teams often end up creating node groups to cover different CPU, memory, or pricing needs. This increases operational overhead and makes the cluster harder to reason about.
Existing node group characteristics constrain Cluster Autoscaler's scaling decisions, limiting its flexibility for right-sizing capacity. It cannot freely mix instance types or choose a best-fit shape for a specific set of pending pods.
The result is often overprovisioning to handle peak demand or persistent underutilization when workloads don't align neatly with the available node sizes. Over time, this inefficiency shows up directly in cloud bills.
Cluster Autoscaler follows a fairly rigid scaling model. While it supports basic constraints and some customization, adapting it to more advanced requirements, such as workload-aware prioritization or spot-first strategies, can be difficult. It's also closely tied to cloud-provider-specific implementations, which complicates hybrid or non-standard environments. For teams pushing Kubernetes beyond its default patterns, these constraints can become a bottleneck rather than a safeguard.
These limitations don't make Cluster Autoscaler obsolete, but they do explain why many teams are looking for alternatives. Karpenter rethinks how autoscaling decisions are made and how infrastructure is provisioned in response.
Karpenter is a modern Kubernetes autoscaler designed to provision compute capacity with far fewer assumptions about the underlying infrastructure. It was originally created by Amazon Web Services to address real-world scaling challenges seen in large EKS clusters, and has since become part of the CNCF ecosystem.
Unlike the Kubernetes Cluster Autoscaler, Karpenter works alongside the Kubernetes scheduler. When a pod can't be scheduled because of insufficient resources, Karpenter observes the event and immediately evaluates what kind of node would satisfy the pod's requirements. Instead of scaling an existing node group, it provisions a new node that is purpose-built for the workload, selecting the appropriate instance type, size, architecture, and availability zone on the fly.
Here's how it fits with other Kubernetes components:

Karpenter does not rely on predefined node groups. Nodes are launched independently, based on declarative provisioning rules rather than fixed scaling boundaries. This allows Karpenter to choose from a wide range of instance families and capacities and mix and match them to achieve better bin-packing and faster scheduling. From the user's perspective, this dramatically reduces the need to pre-plan infrastructure layouts.
Karpenter aims for speed, efficiency, and simplicity. It uses an event-driven reconciliation model instead of periodic polling, which enables near-instant reactions to changes in demand.
Karpenter reacts as soon as pods become unschedulable. Instead of waiting for periodic reconciliation loops, it responds to scheduling events and immediately starts provisioning capacity. In practice, this means new nodes can be launched in a matter of a few minutes.
For bursty workloads, rapid rollouts, or traffic spikes, this responsiveness can be the difference between smooth scaling and visible service degradation.
When provisioning new nodes, Karpenter evaluates the actual resource requirements of pending pods. It considers CPU, memory, architecture, zones, and other constraints, then selects the most suitable instance type available at that moment.
Because it can choose across multiple instance families automatically, Karpenter avoids the rigid "one size fits all" approach of static node groups and achieves better packing efficiency across the cluster.
With Karpenter, there is no need to manage fleets of Auto Scaling Groups or managed node groups. Instead, teams define high-level provisioning rules that describe acceptable capacity, such as allowed instance families, zones, or pricing models.
This declarative approach reduces YAML sprawl and ongoing maintenance, making autoscaling easier to reason about as the cluster evolves.
Karpenter makes it easy to blend on-demand and spot capacity within the same cluster. By dynamically selecting from available capacity pools, it can take advantage of cheaper spot instances when they are available, while falling back to on-demand instances when necessary.
Karpenter is built to integrate cleanly with Kubernetes primitives like labels, taints, and topology constraints. It also follows a provider-specific controller model, which allows different cloud environments, like AWS, Azure, Alibaba Cloud, etc., to implement their own provisioning logic while keeping the core autoscaling behavior consistent. This makes Karpenter adaptable to evolving infrastructure patterns and a better fit for modern, cloud-native platforms.
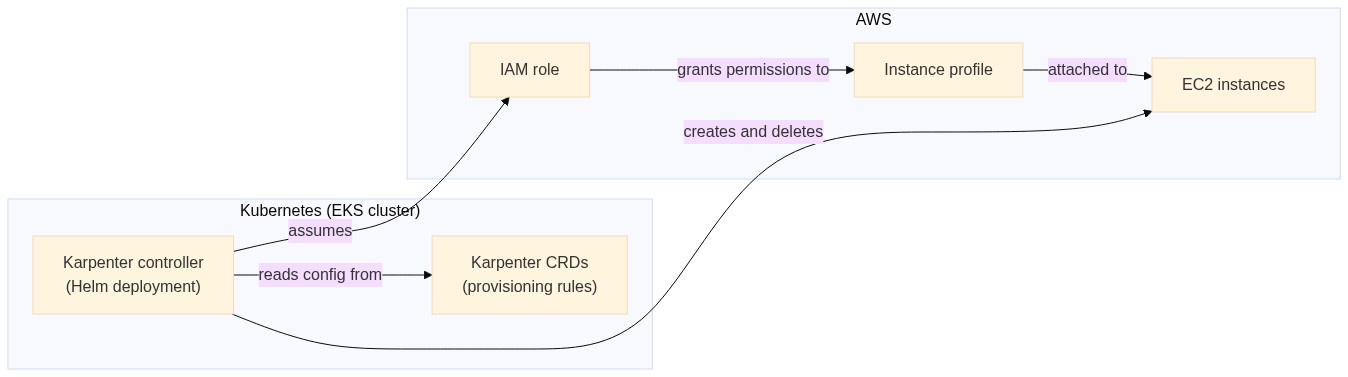
To understand how Karpenter functions, it helps to see how it fits into a real AWS-based Kubernetes setup. Let's take a look at a high-level example running Karpenter on Amazon EKS.
Karpenter runs as a controller inside your Kubernetes cluster. It watches scheduling events, evaluates pending pods, and communicates directly with AWS to provision compute capacity. A typical setup on EKS involves three main pieces:
Here's what the setup looks like:
We'll build this out with a fresh EKS cluster.
This tutorial is based on the official getting started guide by Karpenter, but modified for a regular AWS account's resource limits.
If you want to follow along, you'll need the following installed locally:
To create a new EKS cluster, you need to define a few environment variables first:
export KARPENTER_NAMESPACE="kube-system"
export KARPENTER_VERSION="1.8.3"
export K8S_VERSION="1.34"
export AWS_PARTITION="aws"
export CLUSTER_NAME="${USER}-karpenter-demo"
export AWS_DEFAULT_REGION="us-west-2"
export AWS_ACCOUNT_ID="$(aws sts get-caller-identity --query Account --output text)"
export TEMPOUT="$(mktemp)"
export ALIAS_VERSION="$(aws ssm get-parameter --name "/aws/service/eks/optimized-ami/${K8S_VERSION}/amazon-linux-2023/x86_64/standard/recommended/image_id" --query Parameter.Value | xargs aws ec2 describe-images --query 'Images[0].Name' --image-ids | sed -r 's/^.*(v[[:digit:]]+).*$/\1/')"
Once you have these in place, run the following commands to:
curl -fsSL https://raw.githubusercontent.com/aws/karpenter-provider-aws/v"${KARPENTER_VERSION}"/website/content/en/preview/getting-started/getting-started-with-karpenter/cloudformation.yaml  > "${TEMPOUT}" \
&& aws cloudformation deploy \
  --stack-name "Karpenter-${CLUSTER_NAME}" \
  --template-file "${TEMPOUT}" \
  --capabilities CAPABILITY_NAMED_IAM \
  --parameter-overrides "ClusterName=${CLUSTER_NAME}"

eksctl create cluster -f - <<EOF
---
apiVersion: eksctl.io/v1alpha5
kind: ClusterConfig
metadata:
  name: ${CLUSTER_NAME}
  region: ${AWS_DEFAULT_REGION}
  version: "${K8S_VERSION}"
  tags:
    karpenter.sh/discovery: ${CLUSTER_NAME}

iam:
  withOIDC: true
  podIdentityAssociations:
  - namespace: "${KARPENTER_NAMESPACE}"
    serviceAccountName: karpenter
    roleName: ${CLUSTER_NAME}-karpenter
    permissionPolicyARNs:
    - arn:${AWS_PARTITION}:iam::${AWS_ACCOUNT_ID}:policy/KarpenterControllerPolicy-${CLUSTER_NAME}

iamIdentityMappings:
- arn: "arn:${AWS_PARTITION}:iam::${AWS_ACCOUNT_ID}:role/KarpenterNodeRole-${CLUSTER_NAME}"
  username: system:node:{{EC2PrivateDNSName}}
  groups:
  - system:bootstrappers
  - system:nodes

managedNodeGroups:
- instanceType: m5.large
  amiFamily: AmazonLinux2023
  name: ${CLUSTER_NAME}-ng
  desiredCapacity: 2
  minSize: 1
  maxSize: 10

addons:
- name: eks-pod-identity-agent
EOF

export CLUSTER_ENDPOINT="$(aws eks describe-cluster --name "${CLUSTER_NAME}" --query "cluster.endpoint" --output text)"
export KARPENTER_IAM_ROLE_ARN="arn:${AWS_PARTITION}:iam::${AWS_ACCOUNT_ID}:role/${CLUSTER_NAME}-karpenter"

echo "${CLUSTER_ENDPOINT} ${KARPENTER_IAM_ROLE_ARN}"
Now, you're ready to deploy Karpenter.
Run the following command to install Karpenter on your EKS cluster:
helm upgrade --install karpenter oci://public.ecr.aws/karpenter/karpenter --version "${KARPENTER_VERSION}" --namespace "${KARPENTER_NAMESPACE}" --create-namespace \
  --set "settings.clusterName=${CLUSTER_NAME}" \
  --set "settings.interruptionQueue=${CLUSTER_NAME}" \
  --set controller.resources.requests.cpu=1 \
  --set controller.resources.requests.memory=1Gi \
  --set controller.resources.limits.cpu=1 \
  --set controller.resources.limits.memory=1Gi \
  --wait
Once installed, you define provisioning behavior using resources such as a NodePool and an AWS-specific EC2NodeClass. These objects describe what kind of instances Karpenter is allowed to create.
Run the following command to set up NodePool and EC2NodeClass:
cat <<EOF | envsubst | kubectl apply -f -
apiVersion: karpenter.sh/v1
kind: NodePool
metadata:
  name: default
spec:
  template:
    spec:
      requirements:
        - key: kubernetes.io/arch
          operator: In
          values: ["amd64"]
        - key: kubernetes.io/os
          operator: In
          values: ["linux"]
        - key: karpenter.sh/capacity-type
          operator: In
          values: ["on-demand"]
        - key: karpenter.k8s.aws/instance-cpu
          operator: In
          values: ["2","4"]
        - key: karpenter.k8s.aws/instance-category
          operator: In
          values: ["c","m","t"]
        - key: karpenter.k8s.aws/instance-generation
          operator: Gt
          values: ["2"]
      nodeClassRef:
        group: karpenter.k8s.aws
        kind: EC2NodeClass
        name: default
      expireAfter: 720h
  limits:
    cpu: 8
  disruption:
    consolidationPolicy: WhenEmptyOrUnderutilized
    consolidateAfter: 1m
---
apiVersion: karpenter.k8s.aws/v1
kind: EC2NodeClass
metadata:
  name: default
spec:
  role: "KarpenterNodeRole-\${CLUSTER_NAME}"
  amiSelectorTerms:
    - alias: "al2023@\${ALIAS_VERSION}"
  subnetSelectorTerms:
    - tags:
        karpenter.sh/discovery: "\${CLUSTER_NAME}"
  securityGroupSelectorTerms:
    - tags:
        karpenter.sh/discovery: "\${CLUSTER_NAME}"
EOF
This configuration is adapted from the official guide, modified to stay within the 8 vCPU default limit imposed on regular AWS accounts.
Let's test everything out. First, create a new deployment by running the following command:
cat <<EOF | kubectl apply -f -
apiVersion: apps/v1
kind: Deployment
metadata:
  name: inflate
spec:
  replicas: 1
  selector:
    matchLabels:
      app: inflate
  template:
    metadata:
      labels:
        app: inflate
    spec:
      terminationGracePeriodSeconds: 0
      securityContext:
        runAsUser: 1000
        runAsGroup: 3000
        fsGroup: 2000
      containers:
      - name: inflate
        image: public.ecr.aws/eks-distro/kubernetes/pause:3.7
        resources:
          requests:
            cpu: 250m
            memory: 64Mi
        securityContext:
          allowPrivilegeEscalation: false
EOF
This code is also adapted from the official guide, modified to include resource request limits to help individual instances fit easily on a 2 vCPU node.
This creates a new deployment with one replica on your cluster. You can verify this by running the following command:
kubectl get pods -l app=inflate -o wide

NAME                       READY   STATUS    RESTARTS   AGE   IP              NODE                                           NOMINATED NODE   READINESS GATES
inflate-6dc5958b84-tgk89   1/1     Running   0          46s   192.168.84.27   ip-192-168-81-216.us-west-2.compute.internal   <none>           <none>
This is deployed on the ip-192-168-81-216.us-west-2.compute.internal node.
Now, scale this deployment up to eight replicas by running the following command:
kubectl scale deployment inflate --replicas 8
If you try running the kubectl get pods command again, you should see an output like this:
kubectl get pods -l app=inflate -o wide
NAME                       READY   STATUS    RESTARTS   AGE     IP                NODE                                            NOMINATED NODE   READINESS GATES
inflate-6dc5958b84-4qfdp   1/1     Running   0          63s     192.168.120.221   ip-192-168-120-248.us-west-2.compute.internal   <none>           <none>
inflate-6dc5958b84-75m7v   1/1     Running   0          63s     192.168.126.51    ip-192-168-120-248.us-west-2.compute.internal   <none>           <none>
inflate-6dc5958b84-9gk2x   1/1     Running   0          63s     192.168.79.19     ip-192-168-81-216.us-west-2.compute.internal    <none>           <none>
inflate-6dc5958b84-j9n8x   1/1     Running   0          63s     192.168.112.80    ip-192-168-120-248.us-west-2.compute.internal   <none>           <none>
inflate-6dc5958b84-lsjr5   1/1     Running   0          63s     192.168.7.144     ip-192-168-27-91.us-west-2.compute.internal     <none>           <none>
inflate-6dc5958b84-nwt64   1/1     Running   0          63s     192.168.96.62     ip-192-168-120-248.us-west-2.compute.internal   <none>           <none>
inflate-6dc5958b84-tgk89   1/1     Running   0          2m35s   192.168.84.27     ip-192-168-81-216.us-west-2.compute.internal    <none>           <none>
inflate-6dc5958b84-vlhfb   1/1     Running   0          63s     192.168.101.48    ip-192-168-120-248.us-west-2.compute.internal   <none>           <none>
You'll notice that the pods are spread across ip-192-168-81-216.us-west-2.compute.internal (the original node), ip-192-168-120-248.us-west-2.compute.internal, and ip-192-168-27-91.us-west-2.compute.internal.
If you run kubectl get nodes, you'll see something like:
kubectl get nodes
NAME                                            STATUS   ROLES    AGE   VERSION
ip-192-168-120-248.us-west-2.compute.internal   Ready    <none>   69s   v1.34.2-eks-ecaa3a6
ip-192-168-27-91.us-west-2.compute.internal     Ready    <none>   79m   v1.34.2-eks-ecaa3a6
ip-192-168-81-216.us-west-2.compute.internal    Ready    <none>   79m   v1.34.2-eks-ecaa3a6
The nodes ip-192-168-81-216.us-west-2.compute.internal and ip-192-168-27-91.us-west-2.compute.internal were available before the deployment was scaled. Upon scaling, a replica was added to ip-192-168-27-91.us-west-2.compute.internal, which had available resources. When no more resources were available, Karpenter created the ip-192-168-120-248.us-west-2.compute.internal node with the right size to host the rest of the pods.
This confirms that Karpenter is actively managing compute capacity for the cluster.
On EKS, Karpenter automatically selects from a wide range of EC2 instance types and availability zones, making better use of spot capacity when it's available. Because it works directly with AWS APIs and the Kubernetes scheduler, scaling events are both faster and more cost-efficient than traditional approaches.
While Karpenter addresses many of the structural limits of Cluster Autoscaler, it's not a universal solution yet. AWS remains the most mature and fully supported environment, with other providers such as GCP, Azure, and custom or on-prem platforms still catching up in terms of features, stability, and documentation. For teams operating across multiple clouds, this uneven ecosystem maturity can make Karpenter harder to adopt than the more broadly supported Cluster Autoscaler, which still offers wider provider coverage.
These gaps have led to newer approaches that rethink how autoscaling is applied in tenant-isolated and multi-cluster setups. One such approach is vCluster Auto Nodes, which combines dynamic node provisioning with tenant clusters to give teams more isolated, predictable scaling behavior, even when the underlying autoscaler support varies by provider.
Autoscaling is a critical concern for modern Kubernetes platforms, and Cluster Autoscaler has some limitations that have caused teams to look for alternatives.
Karpenter rethinks autoscaling by working directly with the scheduler, provisioning right-sized nodes on demand, and reducing the operational overhead of managing node groups, especially in fast-moving, cost-sensitive environments.
However, Karpenter is not a one-size-fits-all solution, particularly in multi-cloud and tenant-isolated scenarios. Approaches like vCluster Auto Nodes build on Karpenter's strengths while adding clearer isolation and more predictable scaling boundaries. In the next article, we'll dive deeper into vCluster Auto Nodes, how they work in practice, and when they make the most sense as part of a Kubernetes platform strategy.
Deploy your first virtual cluster today.
