Snapshot and Restore for vCluster Docker Driver: Share Your Entire Kubernetes Environment as a File

May 5, 2026
|
14
min Read

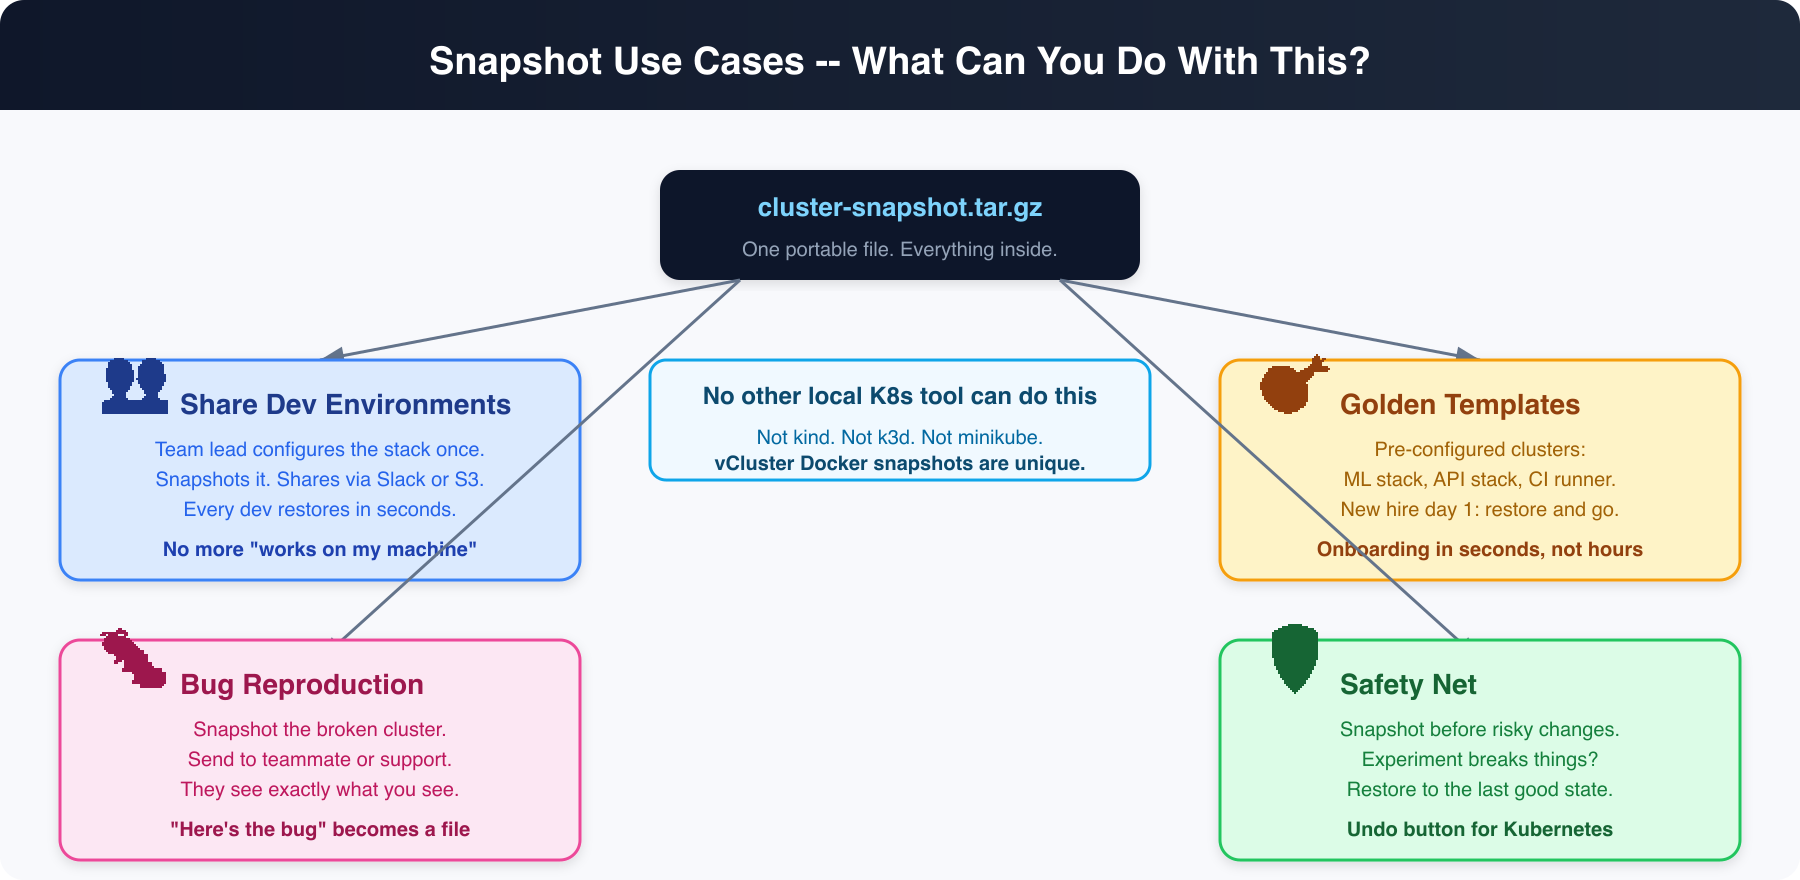
We just shipped snapshot and restore for vCluster's Docker driver (vind) in v0.34.0. This means you can capture your entire local Kubernetes cluster -- every deployment, every service, every configmap, every PVC with its data -- into a single .tar.gz file. Then restore it on any machine with Docker. One command each way.
No other local Kubernetes tool can do this.
If you've used vCluster's Docker driver (vind), you know the pitch: real Kubernetes clusters running as Docker containers. Create, pause, resume, delete -- all locally, all fast. But there was one missing piece: what if you want to save your cluster state and move it?
Real use cases:
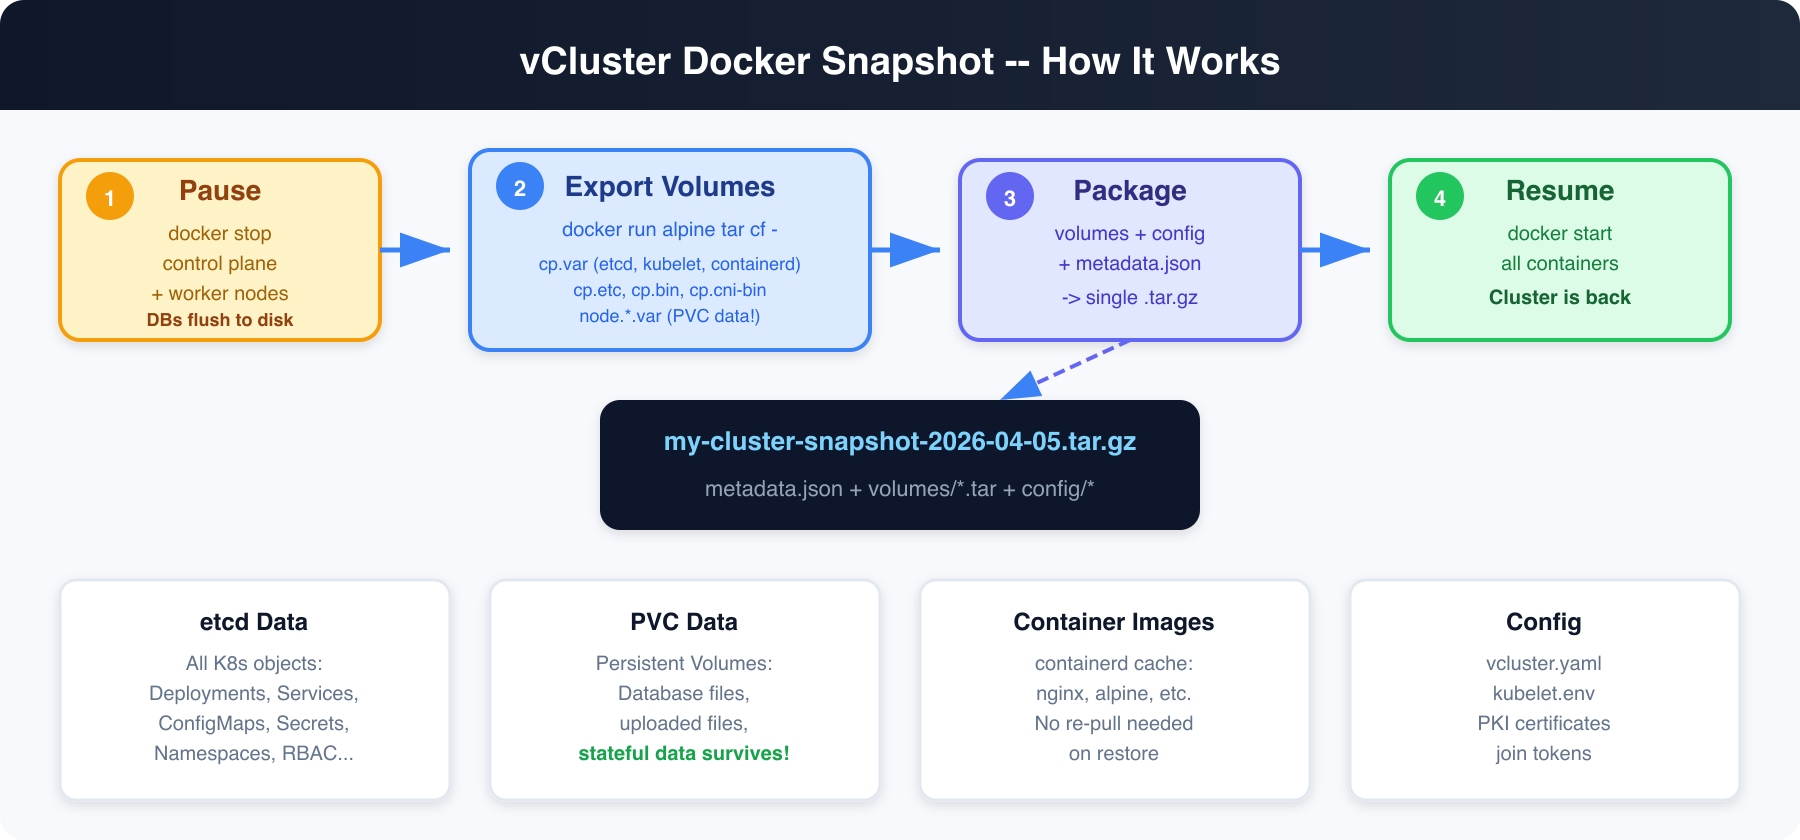
vind runs Kubernetes as Docker containers. The control plane (etcd, kube-apiserver, kube-scheduler, kube-controller-manager) runs in one container. Worker nodes run in separate containers. All persistent state lives in Docker named volumes.
Here's what gets captured:
Yes. This was the first thing we tested.
vind uses local-path-provisioner for PVCs (same as k3s). PVC data lives inside the Docker volume at /var/lib/kubelet/pods/<uid>/volumes/. When we export the Docker volume, we capture everything -- including database files.
Because we pause the cluster before snapshotting, databases get a clean shutdown and flush their write-ahead logs to disk. On restore, they replay the WAL and come back clean. This is the same mechanism that makes VM snapshots (AWS EBS, VMware) work for databases.
We tested with:
# macOS arm64
curl -L -o vcluster https://github.com/loft-sh/vcluster/releases/download/v0.34.0/vcluster-darwin-arm64
chmod +x vcluster && sudo mv vcluster /usr/local/bin/

# macOS amd64
curl -L -o vcluster https://github.com/loft-sh/vcluster/releases/download/v0.34.0/vcluster-darwin-amd64
chmod +x vcluster && sudo mv vcluster /usr/local/bin/

# Linux amd64
curl -L -o vcluster https://github.com/loft-sh/vcluster/releases/download/v0.34.0/vcluster-linux-amd64
chmod +x vcluster && sudo mv vcluster /usr/local/bin/
# Set the driver to Docker
vcluster use driver docker

# Create a cluster (defaults to v0.34.0)
vcluster create my-project --driver docker
Output:
info  Using vCluster driver 'docker' to create your virtual clusters
info  Ensuring environment for vCluster my-project...
done  Created network vcluster.my-project
info  Starting vCluster standalone my-project
info  Waiting for vCluster standalone node to be joined...
done  vCluster standalone node joined successfully
done  Successfully created virtual cluster my-project
info  Waiting for vCluster to become ready...
done  vCluster is ready
done  Switched active kube context to vcluster-docker_my-project
- Use `vcluster disconnect` to return to your previous kube context
- Use `kubectl get namespaces` to access the vcluster
You now have a real Kubernetes cluster running inside Docker.
Let's set up something realistic -- a web app with persistent storage, configuration, and a service.
kubectl apply -f - <<'EOF'
apiVersion: v1
kind: Namespace
metadata:
  name: production

---
apiVersion: v1
kind: ConfigMap
metadata:
  name: app-config
  namespace: production
data:
  DATABASE_URL: "postgres://localhost:5432/mydb"
  REDIS_URL: "redis://localhost:6379"
  APP_VERSION: "3.2.1"
  ENVIRONMENT: "production"

---
apiVersion: v1
kind: PersistentVolumeClaim
metadata:
  name: app-storage
  namespace: production
spec:
  accessModes: [ReadWriteOnce]
  resources:
    requests:
      storage: 100Mi

---
apiVersion: apps/v1
kind: Deployment
metadata:
  name: web-app
  namespace: production
spec:
  replicas: 2
  selector:
    matchLabels:
      app: web-app
  template:
    metadata:
      labels:
        app: web-app
    spec:
      containers:
      - name: app
        image: nginx:alpine
        ports:
        - containerPort: 80
        envFrom:
        - configMapRef:
            name: app-config
        volumeMounts:
        - name: storage
          mountPath: /data
        command:
        - sh
        - -c
        - |
          echo "Application data created at $(date)" > /data/app.log
          echo "User records: 1,247 active accounts" >> /data/app.log
          echo "Last backup: never (until now!)" >> /data/app.log
          nginx -g 'daemon off;'
      volumes:
      - name: storage
        persistentVolumeClaim:
          claimName: app-storage

---
apiVersion: v1
kind: Service
metadata:
  name: web-app
  namespace: production
spec:
  selector:
    app: web-app
  ports:
  - port: 80
    targetPort: 80
EOF
Wait for everything to be ready:
kubectl wait --for=condition=ready pod -l app=web-app -n production --timeout=60s
Verify the full stack:
$ kubectl get all,configmap,pvc -n production
NAME                               READY   STATUS    RESTARTS   AGE
pod/web-app-747ff69dd7-6t5kd       1/1     Running   0          2m8s
pod/web-app-747ff69dd7-km6pf       1/1     Running   0          2m8s

NAME              TYPE        CLUSTER-IP       EXTERNAL-IP   PORT(S)   AGE
service/web-app   ClusterIP   10.111.161.85    <none>        80/TCP    2m8s

NAME                      READY   UP-TO-DATE   AVAILABLE   AGE
deployment.apps/web-app   2/2     2            2           2m8s

NAME                         DATA   AGE
configmap/app-config         4      2m8s
configmap/kube-root-ca.crt   1      2m8s

NAME                                STATUS   VOLUME                                     CAPACITY   ACCESS MODES
persistentvolumeclaim/app-storage   Bound    pvc-d640045d-2c87-4852-9193-a9620d6dee38   100Mi      RWO
Check the persistent data:
$ kubectl exec deploy/web-app -n production -- cat /data/app.log
Application data created at Mon May  4 09:51:26 UTC 2026
User records: 1,247 active accounts
Last backup: never (until now!)
$ vcluster snapshot create my-project --driver docker
info  Pausing vCluster my-project for consistent snapshot...
info  Pausing vCluster my-project...
done  Successfully paused vCluster my-project
info  Exporting volume cp.bin...
info  Exporting volume cp.cni-bin...
info  Exporting volume cp.var...
info  Exporting volume cp.etc...
info  Exporting config directory...
done  Snapshot saved to my-project-snapshot-2026-05-04T15-19-35.tar.gz
info  Resuming vCluster my-project...
done  Successfully resumed vCluster my-project
That's it. Your entire cluster is now in a single file:
$ ls -lh my-project-snapshot-*.tar.gz
-rw-r--r--  1 saiyam  staff  341M  4 May 15:20 my-project-snapshot-2026-05-04T15-19-35.tar.gz
You can also specify an explicit path:
vcluster snapshot create my-project ./backups/my-project-backup.tar.gz --driver docker
Or push directly to an OCI registry:
$ vcluster snapshot create my-project oci://ghcr.io/myorg/snapshots:my-project --driver docker
info  Pausing vCluster my-project for consistent snapshot...
info  Pausing vCluster my-project...
done  Successfully paused vCluster my-project
info  Exporting volume cp.bin...
info  Exporting volume cp.cni-bin...
info  Exporting volume cp.var...
info  Exporting volume cp.etc...
info  Exporting config directory...
info  Pushing snapshot to oci://ghcr.io/myorg/snapshots:my-project...
done  Snapshot pushed to oci://ghcr.io/myorg/snapshots:my-project
info  Resuming vCluster my-project...
done  Successfully resumed vCluster my-project
Or to S3:
vcluster snapshot create my-project "s3://my-bucket/my-snapshot" --driver docker
$ vcluster delete my-project --driver docker
info  Removing vCluster container vcluster.cp.my-project...
info  Deleted kube context vcluster-docker_my-project
done  Successfully deleted virtual cluster my-project

$ vcluster list --driver docker
# my-project is gone -- only any pre-existing clusters remain
The cluster, all its data, all its volumes -- everything is gone. In a real scenario, maybe someone ran vcluster delete by accident. Or you're moving to a new laptop.
You have two ways to restore. The restore command, or the create --restore flag which lets you create a new cluster directly from a snapshot -- useful when you want a different name:
$ vcluster restore my-project ./my-project-snapshot-2026-05-04T15-19-35.tar.gz --driver docker
info  Restoring Docker-based vCluster from snapshot (note: Docker snapshots can only be restored as Docker-based vClusters, not helm or platform-based)
info  Restoring volume cp.bin...
info  Restoring volume cp.cni-bin...
info  Restoring volume cp.var...
info  Restoring volume cp.etc...
info  Starting vCluster my-project from restored snapshot...
info  Ensuring environment for vCluster my-project...
done  Created network vcluster.my-project
info  Starting vCluster standalone my-project
info  Waiting for vCluster standalone node to be joined...
done  vCluster standalone node joined successfully
done  Successfully created virtual cluster my-project
info  Waiting for vCluster to become ready...
done  vCluster is ready
done  Switched active kube context to vcluster-docker_my-project
- Use `vcluster disconnect` to return to your previous kube context
- Use `kubectl get namespaces` to access the vcluster
done  Successfully restored vCluster my-project from snapshot
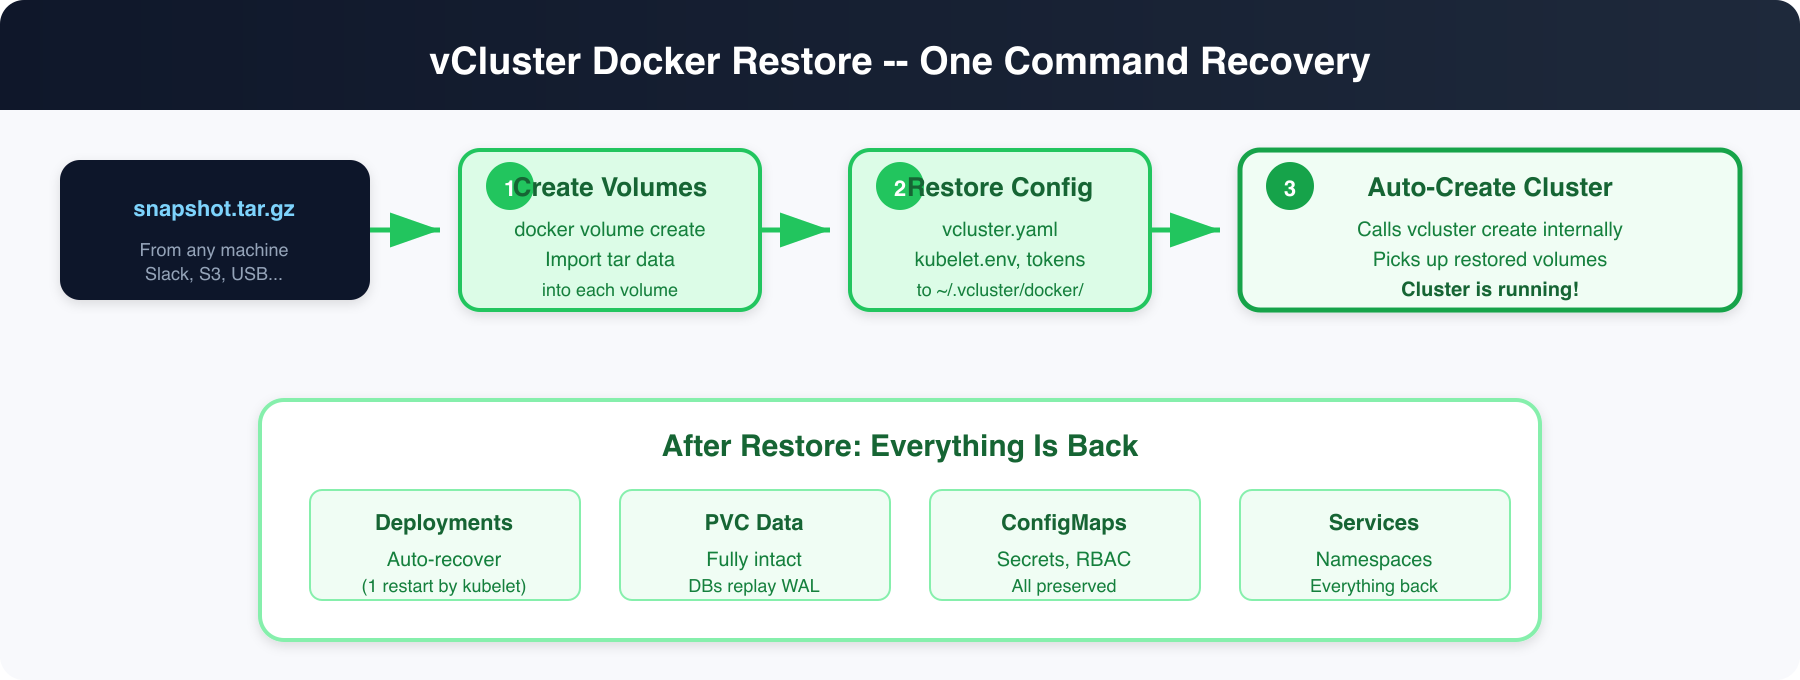
One command. Volumes restored, cluster started, kubeconfig set.
Or restore directly from an OCI registry -- your teammate doesn't even need the file:
$ vcluster restore my-project oci://ghcr.io/myorg/snapshots:my-project --driver docker
info  Pulling snapshot from oci://ghcr.io/myorg/snapshots:my-project...
done  Snapshot downloaded to temp file
info  Restoring Docker-based vCluster from snapshot (note: Docker snapshots can only be restored as Docker-based vClusters, not helm or platform-based)
info  Restoring volume cp.bin...
info  Restoring volume cp.cni-bin...
info  Restoring volume cp.var...
info  Restoring volume cp.etc...
info  Starting vCluster my-project from restored snapshot...
done  Successfully created virtual cluster my-project
done  Successfully restored vCluster my-project from snapshot
Same works with S3:
vcluster restore my-project "s3://my-bucket/my-snapshot" --driver docker
The --restore flag on vcluster create lets you create a cluster with a different name from a snapshot. This is perfect for cloning environments:
# Snapshot was from "my-project". Create a new cluster called "debug-copy":
$ vcluster create debug-copy --restore ./my-project-snapshot-2026-05-04T15-19-35.tar.gz --driver docker
info  Using vCluster driver 'docker' to create your virtual clusters
info  Restoring Docker-based vCluster from snapshot (note: Docker snapshots can only be restored as Docker-based vClusters, not helm or platform-based)
info  Restoring volume cp.bin...
info  Restoring volume cp.cni-bin...
info  Restoring volume cp.var...
info  Restoring volume cp.etc...
info  Starting vCluster debug-copy from restored snapshot...
info  Ensuring environment for vCluster debug-copy...
done  Created network vcluster.debug-copy
info  Starting vCluster standalone debug-copy
info  Waiting for vCluster standalone node to be joined...
done  vCluster standalone node joined successfully
done  Successfully created virtual cluster debug-copy
done  vCluster is ready
done  Switched active kube context to vcluster-docker_debug-copy
done  Successfully restored vCluster debug-copy from snapshot
# Same works with OCI:
$ vcluster create team-dev --restore oci://ghcr.io/myorg/snapshots:full-stack --driver docker
The cluster gets the new name (debug-copy or team-dev) but all the data, deployments, and PVCs come from the snapshot. The control plane node registers using the original snapshot's cluster name (preserved via a hostname marker file during restore), ensuring the kubelet matches the node record already in etcd -- no stale node objects.
# Wait for controllers to reconcile pods (~30s)
$ kubectl wait --for=condition=ready pod -l app=web-app -n production --timeout=120s
pod/web-app-747ff69dd7-6t5kd condition met
pod/web-app-747ff69dd7-km6pf condition met

$ kubectl get all,configmap,pvc -n production
NAME                               READY   STATUS    RESTARTS      AGE
pod/web-app-747ff69dd7-6t5kd       1/1     Running   1 (31s ago)   4m6s
pod/web-app-747ff69dd7-km6pf       1/1     Running   1 (31s ago)   4m6s

NAME              TYPE        CLUSTER-IP       EXTERNAL-IP   PORT(S)   AGE
service/web-app   ClusterIP   10.111.161.85    <none>        80/TCP    4m6s

NAME                      READY   UP-TO-DATE   AVAILABLE   AGE
deployment.apps/web-app   2/2     2            2           4m6s

NAME                         DATA   AGE
configmap/app-config         4      4m6s
configmap/kube-root-ca.crt   1      4m6s

NAME                                STATUS   VOLUME                                     CAPACITY   ACCESS MODES
persistentvolumeclaim/app-storage   Bound    pvc-d640045d-2c87-4852-9193-a9620d6dee38   100Mi      RWO
Everything is back. The Deployment shows RESTARTS: 1 -- that's the kubelet detecting stale containers from the snapshot and restarting them. This happens automatically for any controller-managed workload (Deployments, StatefulSets, DaemonSets, Jobs).
Now the moment of truth -- the persistent data:
$ kubectl exec deploy/web-app -n production -- cat /data/app.log
Application data created at Mon May  4 09:51:26 UTC 2026
User records: 1,247 active accounts
Last backup: never (until now!)
Identical. The PVC data, the ConfigMap, the Deployment, the Service, the namespace -- everything came back exactly as it was.
And the ConfigMap:
$ kubectl get configmap app-config -n production -o jsonpath='{.data}'
{"APP_VERSION":"3.2.1","DATABASE_URL":"postgres://localhost:5432/mydb","ENVIRONMENT":"production","REDIS_URL":"redis://localhost:6379"}
vcluster delete my-project --driver docker
rm -f my-project-snapshot-2026-05-04T15-19-35.tar.gz
# Team lead sets up the environment once
vcluster create team-env --chart-version v0.34.0
# Install all the tools: prometheus, grafana, ingress, cert-manager, the app...
helm install prometheus prometheus-community/kube-prometheus-stack
helm install ingress ingress-nginx/ingress-nginx
kubectl apply -f our-app-manifests/

# Push to OCI registry -- no file sharing needed
vcluster snapshot create team-env oci://ghcr.io/myorg/dev-envs:full-stack --driver docker

# Every team member, one command:
vcluster restore team-env oci://ghcr.io/myorg/dev-envs:full-stack --driver docker
# Full stack running in seconds. No file downloads, no Slack attachments.
# Create a "starter" cluster for new engineers
vcluster create starter --chart-version v0.34.0
kubectl apply -f onboarding-stack/
vcluster snapshot create starter ./golden-starter.tar.gz --driver docker

# New engineer day 1:
vcluster restore my-dev ./golden-starter.tar.gz --driver docker
# They have a full working environment before their first standup
# About to try something dangerous?
vcluster snapshot create my-cluster --driver docker
# Try the thing
kubectl apply -f experimental-crd.yaml
# It broke everything? Restore.
vcluster delete my-cluster --driver docker
vcluster restore my-cluster ./my-cluster-snapshot-*.tar.gz --driver docker
Local files are great, but the real power is pushing snapshots to a registry. Your team can restore from a URL without ever touching a file.
# Push
vcluster snapshot create my-cluster oci://ghcr.io/myorg/vcluster-snapshots:ml-dev-stack --driver docker

# Anyone on the team restores with one command
vcluster restore my-cluster oci://ghcr.io/myorg/vcluster-snapshots:ml-dev-stack --driver docker
This works with any OCI-compliant registry: GHCR, AWS ECR, Azure ACR, Harbor, and more. Authentication uses your existing docker login credentials. S3 and S3-compatible backends (AWS S3, MinIO, etc.) are also supported via s3:// URLs -- the same storage backends that power helm-based snapshots, so no new dependencies.
Snapshots work with multi-node vind clusters too. All worker node volumes (including PVC data) are captured and restored.
# Create a 3-worker cluster
vcluster create my-cluster --chart-version v0.34.0 \
  -f multi-node.yaml  # contains experimental.docker.nodes config

# Snapshot captures all node volumes
vcluster snapshot create my-cluster ./multi-node-snap.tar.gz --driver docker
# Exporting volume cp.bin...
# Exporting volume cp.cni-bin...
# Exporting volume cp.var...
# Exporting volume cp.etc...
# Exporting volume node.worker-1.var...
# Exporting volume node.worker-2.var...
# Exporting volume node.worker-3.var...
# ...all volumes across all nodes

# Delete and restore
vcluster delete my-cluster --driver docker
vcluster restore my-cluster ./multi-node-snap.tar.gz --driver docker
# Node worker-1 has restored volumes, skipping join (kubelet will re-register)
# Node worker-2 has restored volumes, skipping join (kubelet will re-register)
# Node worker-3 has restored volumes, skipping join (kubelet will re-register)
The key insight: when worker node volumes already exist from a restore, the kubeadm join step is skipped entirely. The kubelet boots with its restored certificates and re-registers with the API server automatically. This preserves PVC data and avoids the "node already exists" error that would otherwise block the rejoin.
Deploy your first virtual cluster today.
