Day 4: External Nodes: Joining a GCP Instance to Your Local vind Cluster

Mar 11, 2026
|
5
min Read

This is where vind gets really interesting. Yesterday we ran a multi-node cluster entirely in Docker containers on your local machine. Today, we’re going to add a real cloud VM, a Google Cloud Compute Engine instance, as a worker node in our local vind cluster.
Think about that for a second. Your control plane runs on your laptop. A real VM in Google Cloud joins as a worker node. Pods get scheduled on it. And it all works over an encrypted VPN tunnel.
KinD can’t do this. No other local Kubernetes tool can do this.
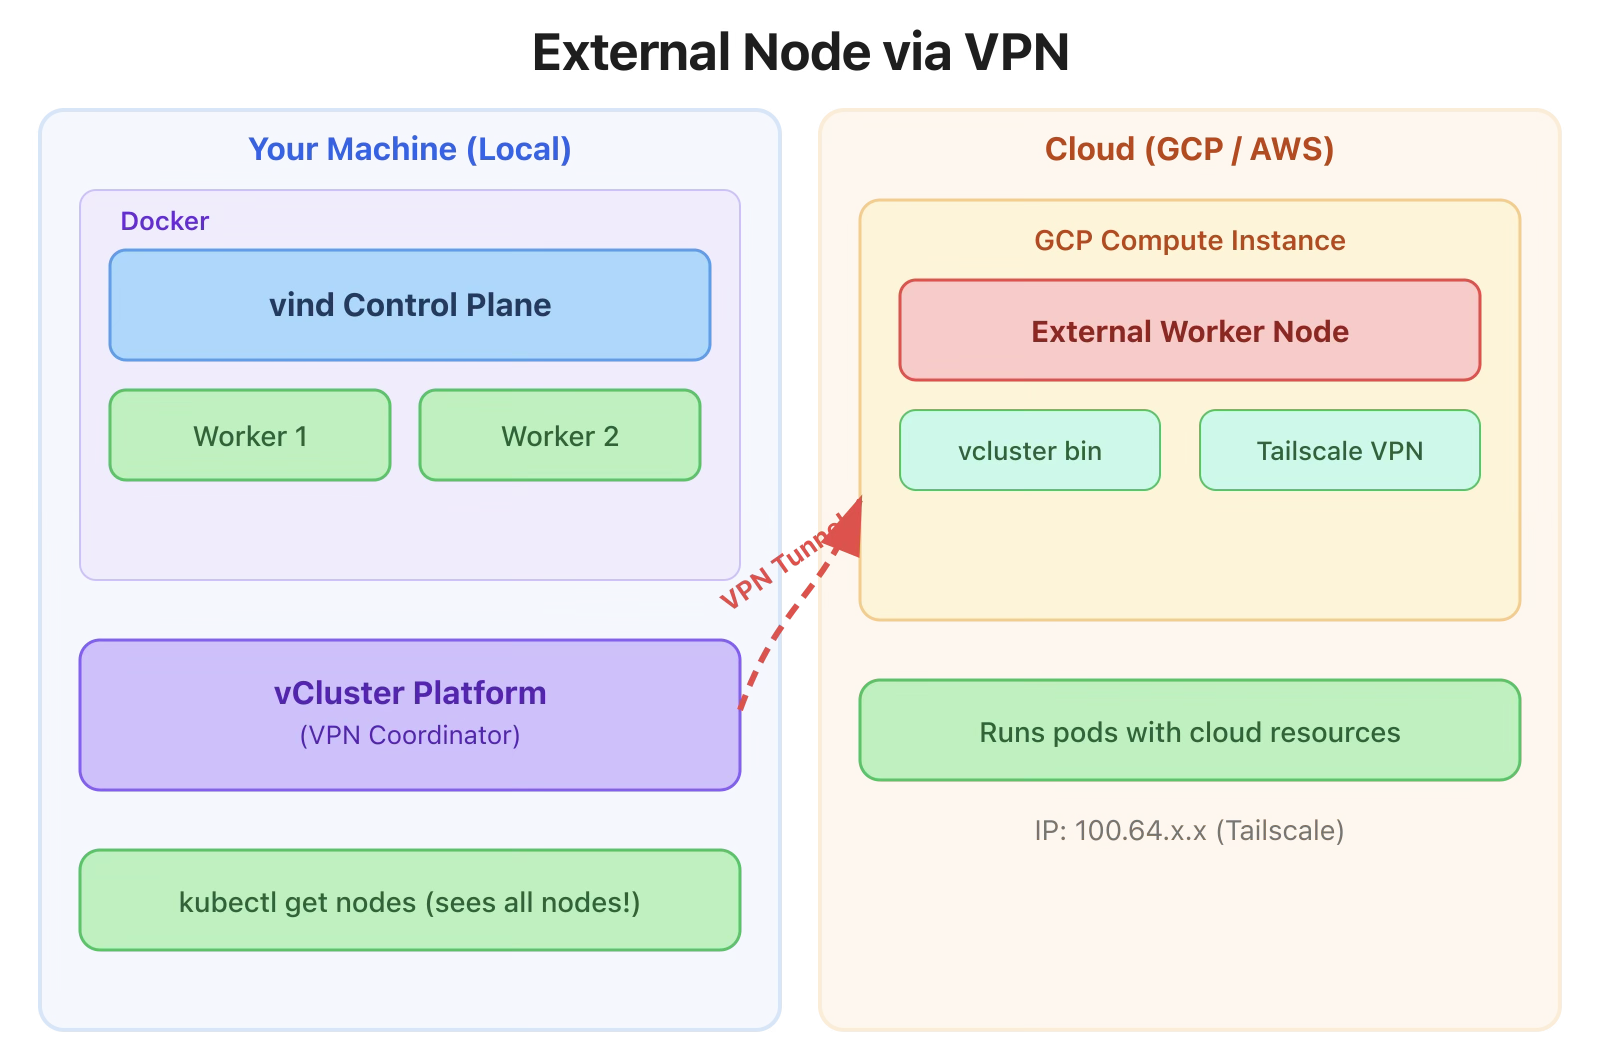
The setup uses Private Nodes mode with VPN:
The Platform is needed because it coordinates the VPN connections between your local cluster and the external node.
vcluster platform start
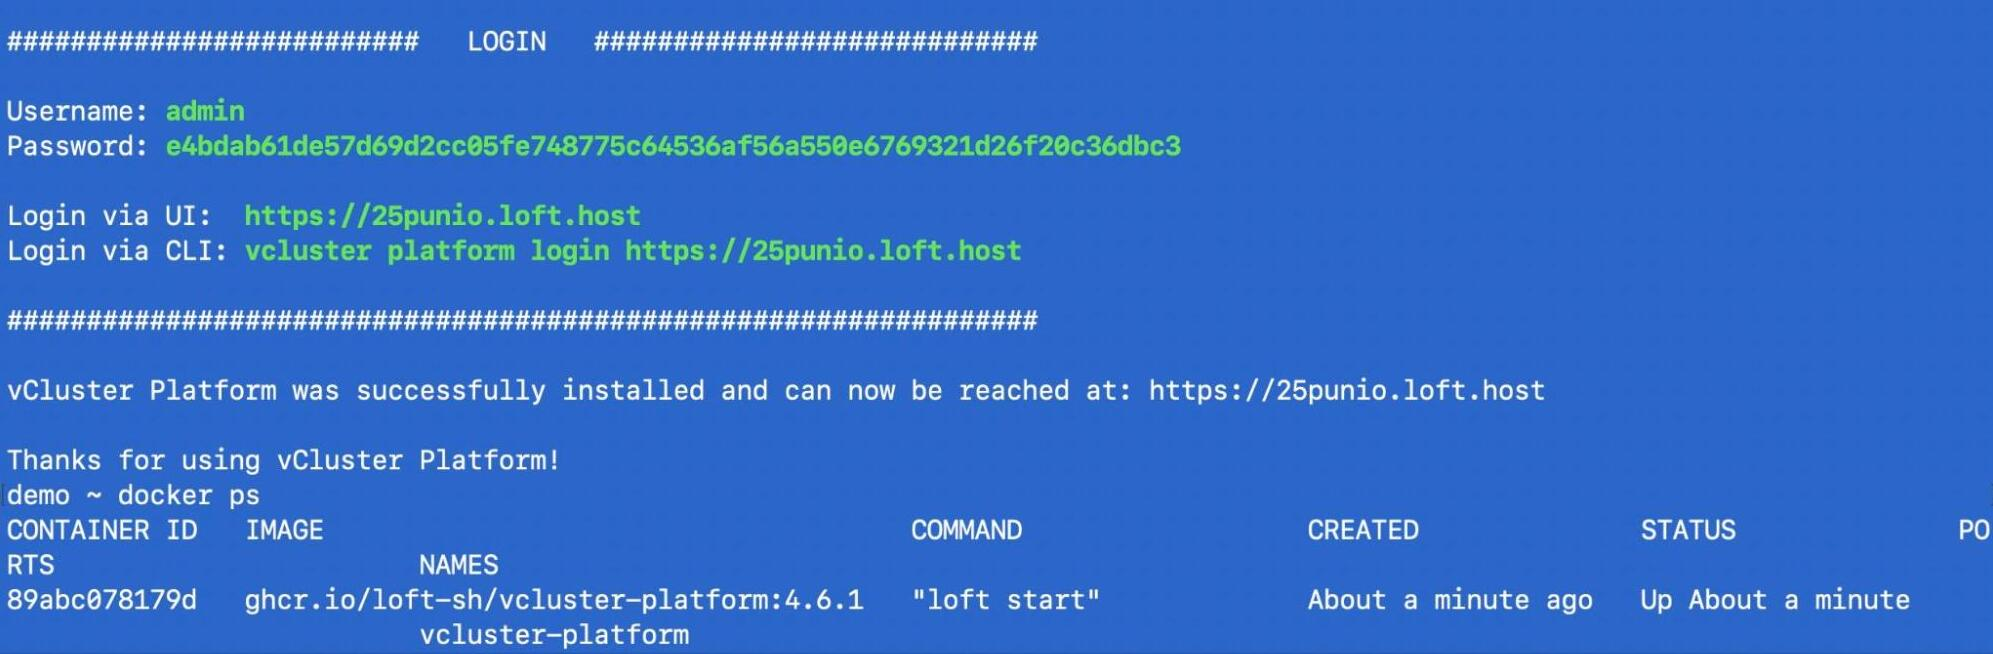
This starts the vCluster Platform UI and makes it accessible. The platform manages the VPN infrastructure that connects your local Docker network to remote nodes.
Important: Start the platform before creating clusters. Clusters created before vcluster platform start won’t be automatically synced to the UI.
Command:
vcluster create hybrid-cluster \
  --set privateNodes.enabled=true \
  --set privateNodes.vpn.enabled=true \
  --set privateNodes.vpn.nodeToNode.enabled=true
The key flags:
Or use a values file:
# hybrid-cluster.yaml
privateNodes:
  enabled: true
  vpn:
    enabled: true
    nodeToNode:
      enabled: truevcluster create hybrid-cluster -f hybrid-cluster.yaml
Output:
17:25:51 info Using vCluster driver 'docker' to create your virtual clusters, which means the CLI is managing Docker-based virtual clusters locally
17:25:51 info If you prefer to use helm or the vCluster platform API instead, use '--driver helm' or '--driver platform', or run 'vcluster use driver helm' or 'vcluster use driver platform' to change the default
17:25:51 info Ensuring environment for vCluster hybrid-cluster...
17:25:51 done Created network vcluster.hybrid-cluster
17:25:56 warn Load balancer type services are not supported inside the vCluster because this command was executed with insufficient privileges. To enable load balancer type services, run this command with sudo
17:25:57 info Will connect vCluster hybrid-cluster to platform...
17:25:59 info Starting vCluster standalone hybrid-cluster
17:26:01 done Successfully created virtual cluster hybrid-cluster
17:26:01 info Finding docker container vcluster.cp.hybrid-cluster...
17:26:01 info Waiting for vCluster kubeconfig to be available...
17:26:03 info Waiting for vCluster to become ready...
17:26:15 done vCluster is ready
17:26:15 done Switched active kube context to vcluster-docker_hybrid-cluster
- Use `vcluster disconnect` to return to your previous kube context
- Use `kubectl get namespaces` to access the vcluster
Once the cluster is created, generate a join token:
Command:
vcluster token create
Output:
curl -fsSLk "https://25punio.loft.host/kubernetes/project/default/virtualcluster/hybrid-cluster/node/join?token=290rr1.vedfxi5yizsoipme" | sh -
This outputs a curl command that you’ll run on the external node. Save it, you’ll need it in the next step.
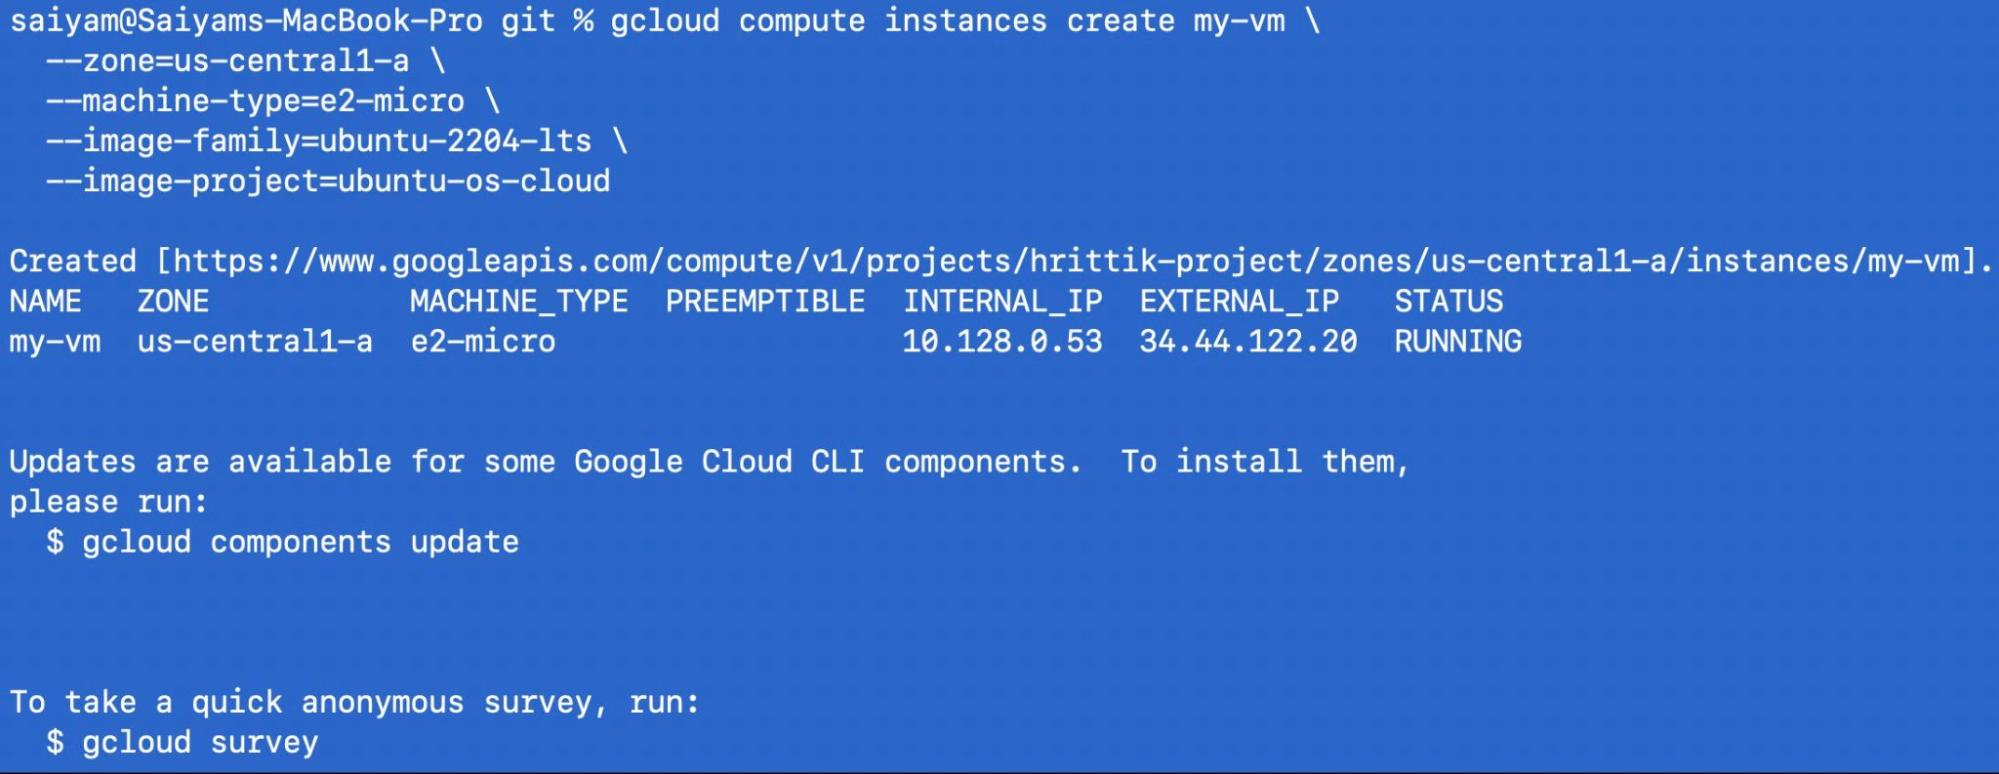
$ gcloud compute instances create my-vm \
  --zone=us-central1-a \
  --machine-type=e2-micro \
  --image-family=ubuntu-2204-lts \
  --image-project=ubuntu-os-cloud
SSH into it:
gcloud compute ssh my-vm --zone=us-central1-a
On the GCP instance, run the join command from Step 3:
saiyam@my-vm:~$ sudo su
root@my-vm:/home/saiyam# curl -fsSLk "https://25punio.loft.host/kubernetes/project/default/virtualcluster/hybrid-cluster/node/join?token=290rr1.vedfxi5yizsoipme" | sh -
Detected OS: ubuntu
Preparing node for Kubernetes installation...
Kubernetes version: v1.34.0
Installing Kubernetes binaries...
Downloading Kubernetes binaries from https://github.com/loft-sh/kubernetes/releases/download...
Loading bridge and br_netfilter modules...
insmod /lib/modules/6.8.0-1046-gcp/kernel/net/llc/llc.ko
insmod /lib/modules/6.8.0-1046-gcp/kernel/net/802/stp.ko
insmod /lib/modules/6.8.0-1046-gcp/kernel/net/bridge/bridge.ko
insmod /lib/modules/6.8.0-1046-gcp/kernel/net/bridge/br_netfilter.ko
Activating ip_forward...
net.ipv4.ip_forward = 1
net.ipv6.conf.all.forwarding = 1
Resetting node...
Ensuring kubelet is stopped...
kubelet service not found
* Applying /etc/sysctl.d/10-console-messages.conf ...
kernel.printk = 4 4 1 7
* Applying /etc/sysctl.d/10-ipv6-privacy.conf ...
net.ipv6.conf.all.use_tempaddr = 2
net.ipv6.conf.default.use_tempaddr = 2
* Applying /etc/sysctl.d/10-kernel-hardening.conf ...
kernel.kptr_restrict = 1
* Applying /etc/sysctl.d/10-magic-sysrq.conf ...
kernel.sysrq = 176
* Applying /etc/sysctl.d/10-network-security.conf ...
net.ipv4.conf.default.rp_filter = 2
net.ipv4.conf.all.rp_filter = 2
* Applying /etc/sysctl.d/10-ptrace.conf ...
kernel.yama.ptrace_scope = 1
* Applying /etc/sysctl.d/10-zeropage.conf ...
vm.mmap_min_addr = 65536
* Applying /usr/lib/sysctl.d/50-default.conf ...
kernel.core_uses_pid = 1
net.ipv4.conf.default.rp_filter = 2
net.ipv4.conf.default.accept_source_route = 0
sysctl: setting key "net.ipv4.conf.all.accept_source_route": Invalid argument
net.ipv4.conf.default.promote_secondaries = 1
sysctl: setting key "net.ipv4.conf.all.promote_secondaries": Invalid argument
net.ipv4.ping_group_range = 0 2147483647
net.core.default_qdisc = fq_codel
fs.protected_hardlinks = 1
fs.protected_symlinks = 1
fs.protected_regular = 1
fs.protected_fifos = 1
* Applying /usr/lib/sysctl.d/50-pid-max.conf ...
kernel.pid_max = 4194304
* Applying /etc/sysctl.d/60-gce-network-security.conf ...
net.ipv4.tcp_syncookies = 1
net.ipv4.conf.all.accept_source_route = 0
net.ipv4.conf.default.accept_source_route = 0
net.ipv4.conf.all.accept_redirects = 0
net.ipv4.conf.default.accept_redirects = 0
net.ipv4.conf.all.secure_redirects = 1
net.ipv4.conf.default.secure_redirects = 1
net.ipv4.ip_forward = 0
net.ipv4.conf.all.send_redirects = 0
net.ipv4.conf.default.send_redirects = 0
net.ipv4.conf.all.rp_filter = 1
net.ipv4.conf.default.rp_filter = 1
net.ipv4.icmp_echo_ignore_broadcasts = 1
net.ipv4.icmp_ignore_bogus_error_responses = 1
net.ipv4.conf.all.log_martians = 1
net.ipv4.conf.default.log_martians = 1
kernel.randomize_va_space = 2
kernel.panic = 10
* Applying /etc/sysctl.d/99-cloudimg-ipv6.conf ...
net.ipv6.conf.all.use_tempaddr = 0
net.ipv6.conf.default.use_tempaddr = 0
* Applying /etc/sysctl.d/99-gce-strict-reverse-path-filtering.conf ...
* Applying /usr/lib/sysctl.d/99-protect-links.conf ...
fs.protected_fifos = 1
fs.protected_hardlinks = 1
fs.protected_regular = 2
fs.protected_symlinks = 1
* Applying /etc/sysctl.d/99-sysctl.conf ...
* Applying /etc/sysctl.d/99-tailscale.conf ...
* Applying /etc/sysctl.conf ...
Starting vcluster-vpn...
Created symlink /etc/systemd/system/multi-user.target.wants/vcluster-vpn.service → /etc/systemd/system/vcluster-vpn.service.
Waiting for vcluster-vpn to be ready...
Waiting for vcluster-vpn to be ready...
Configuring node to node vpn...
Waiting for a tailscale ip...
Starting containerd...
Created symlink /etc/systemd/system/multi-user.target.wants/containerd.service → /etc/systemd/system/containerd.service.
Importing pause image...
registry.k8s.io/pause:3.10               saved
application/vnd.oci.image.manifest.v1+json sha256:a883b8d67f5fe8ae50f857fb4c11c789913d31edff664135b9d4df44d3cb85cb
Importing elapsed: 0.2 s total:   0.0 B (0.0 B/s)
Starting kubelet...
Created symlink /etc/systemd/system/multi-user.target.wants/kubelet.service → /etc/systemd/system/kubelet.service.
Installation successful!
Joining node into cluster...
[preflight] Running pre-flight checks
W0209 16:03:28.474612    1993 file.go:102] [discovery] Could not access the cluster-info ConfigMap for refreshing the cluster-info information, but the TLS cert is valid so proceeding...
[preflight] Reading configuration from the "kubeadm-config" ConfigMap in namespace "kube-system"...
[preflight] Use 'kubeadm init phase upload-config kubeadm --config your-config-file' to re-upload it.
W0209 16:03:30.253845    1993 utils.go:69] The recommended value for "clusterDNS" in "KubeletConfiguration" is: [10.96.0.10]; the provided value is: [10.109.18.131]
[kubelet-start] Writing kubelet configuration to file "/var/lib/kubelet/instance-config.yaml"
[patches] Applied patch of type "application/strategic-merge-patch+json" to target "kubeletconfiguration"
[kubelet-start] Writing kubelet configuration to file "/var/lib/kubelet/config.yaml"
[kubelet-start] Writing kubelet environment file with flags to file "/var/lib/kubelet/kubeadm-flags.env"
[kubelet-start] Starting the kubelet
[kubelet-check] Waiting for a healthy kubelet at http://127.0.0.1:10248/healthz. This can take up to 4m0s
[kubelet-check] The kubelet is healthy after 1.501478601s
[kubelet-start] Waiting for the kubelet to perform the TLS Bootstrap
Back on your local machine:
$ kubectl get nodes -o wide
INTERNAL-IP    EXTERNAL-IP   OS-IMAGE
hybrid-cluster    Ready    control-plane,master   5m    v1.34.0   172.23.0.2     <none>        Ubuntu 24.04.3 LTS
my-vm               Ready    <none>                 2m    v1.34.0   100.64.0.2     <none>        Ubuntu 24.04.3 LTS
They’re on completely different networks, connected via encrypted VPN. But from Kubernetes’ perspective, they’re just nodes in the same cluster.
$ kubectl create deployment hybrid-app --image=nginx:latest --replicas=4deployment.apps/hybrid-app created
$ kubectl get pods -o wide
NAME                         READY   STATUS    RESTARTS   AGE   IP           NODE
hybrid-app-xxx-abc           1/1     Running   0          30s   10.244.0.5   hybrid-cluster
hybrid-app-xxx-def           1/1     Running   0          30s   10.244.0.6   hybrid-cluster
hybrid-app-xxx-ghi           1/1     Running   0          30s   10.244.1.2   my-vm
hybrid-app-xxx-jkl           1/1     Running   0          30s   10.244.1.3   my-vm
Pods are running on both your local machine AND the GCP instance. The scheduler treats them identically.
Add a GPU instance as a worker:
$ gcloud compute instances create gpu-worker \
  --zone=us-central1-a \
  --machine-type=n1-standard-4 \
  --accelerator=count=1,type=nvidia-tesla-t4 \
  --image-family=ubuntu-2404-lts-amd64 \
  --image-project=ubuntu-os-cloud
Join it to your cluster, then schedule GPU pods:
resources:
  limits:
    nvidia.com/gpu: 1
Use node selectors to control where pods run:
spec:
  nodeSelector:
    kubernetes.io/hostname: gpu-worker
Or use taints and tolerations for more complex scheduling.
# Delete the cluster (removes local containers)
Command:
vcluster delete hybrid-cluster
Output:
18:35:37 info Using vCluster driver 'docker' to delete your virtual clusters, which means the CLI is managing Docker-based virtual clusters locally
18:35:37 info If you prefer to use helm or the vCluster platform API instead, use '--driver helm' or '--driver platform', or run 'vcluster use driver helm' or 'vcluster use driver platform' to change the default
18:35:37 info Removing vCluster container vcluster.cp.hybrid-cluster...
18:35:40 info Delete virtual cluster instance p-default/hybrid-cluster in platform
18:35:40 info Deleted kube context vcluster-docker_hybrid-cluster
18:35:40 done Successfully deleted virtual cluster hybrid-cluster
# Delete the GCP instance
$ gcloud compute instances delete my-vm --zone=us-central1-a
External nodes are great for development, but what about your CI/CD pipelines? Tomorrow, we’ll look at the setup-vind GitHub Action — a drop-in replacement for setup-kind that brings all of vind’s features to your GitHub Actions workflows.
All commands tested with vCluster CLI v0.32.1. GCP commands require the gcloud CLI and an active GCP project.
vind is open source: https://github.com/loft-sh/vind, so do star the repo if you like vind
Deploy your first virtual cluster today.
