Syncing Custom Resources into Tenant Clusters - Part 1

Aug 18, 2026
|
12
min Read
vCluster makes it easy to give each team a “real” Kubernetes API inside a fully isolated tenant cluster. Each team gets an isolated tenant cluster with its own Kubernetes API server, which is cheaper and faster to spin up than a separate full-blown cluster, with strong isolation.
The first time a team tries to lock down traffic with Istio AuthorizationPolicy, though, it often fails immediately:
no matches for kind "AuthorizationPolicy" in version "security.istio.io/v1"
This post shows why that happens and how to fix it using custom resource sync. You’ll reproduce the failure on a vCluster Standalone control plane, enable sync, and verify that policies created in the tenant cluster appear on the control plane cluster where Istio can enforce them.
This is Part 1 of a three-part series:
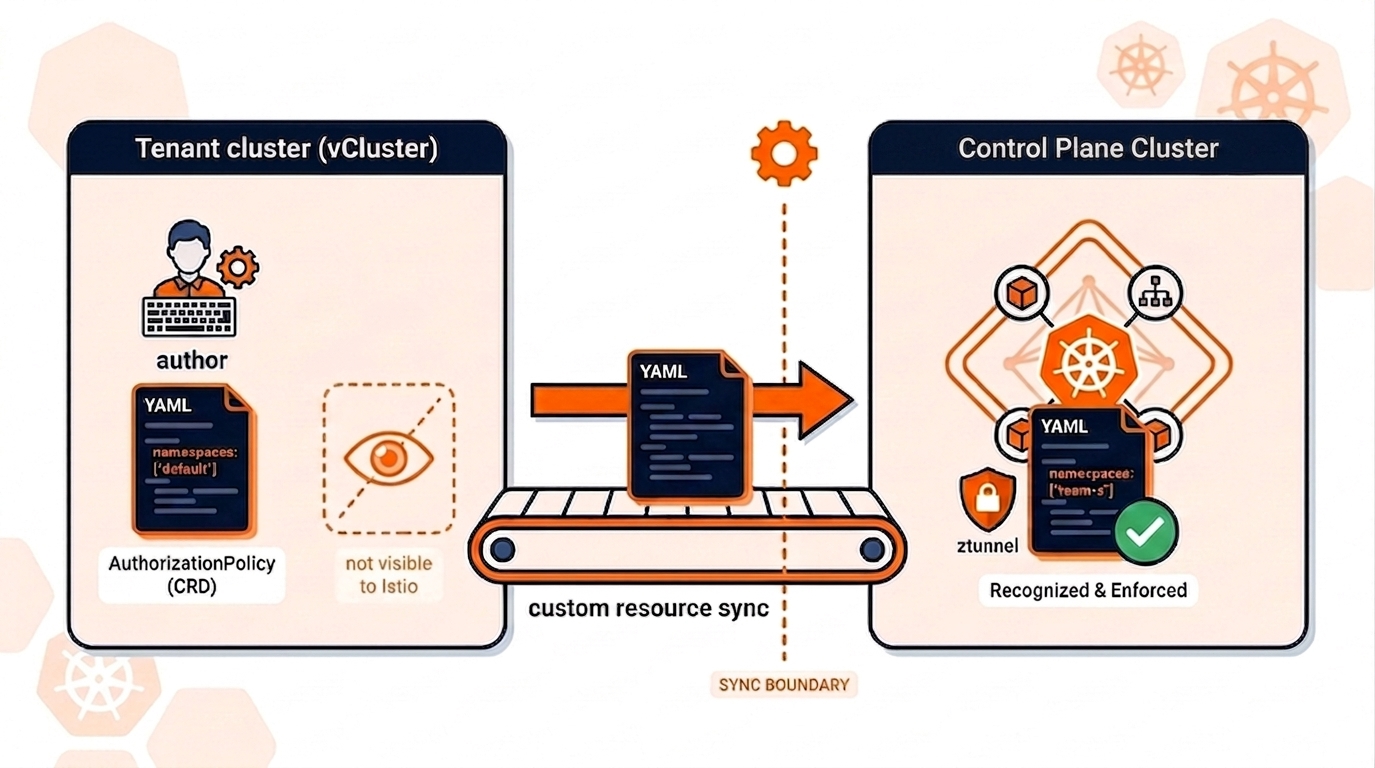
There are always two clusters involved:
vCluster’s job is to synchronize resources across that boundary.
Two quick Kubernetes concepts explain the error:
vCluster’s Istio integration is useful, but it only syncs DestinationRules, Gateways, and VirtualServices from the networking.istio.io/v1 group, and it does not sync the security.istio.io kinds.
So even if Istio is installed on the control plane cluster (and the AuthorizationPolicy CRD exists there), the tenant cluster still doesn’t know that kind exists. When a developer tries to apply an AuthorizationPolicy in the tenant cluster, the tenant API server rejects it because it has never seen the CRD.
With custom resource sync, you tell vCluster which CRDs you want available in the tenant cluster. vCluster then:
Two things happen automatically that are worth knowing about. vCluster adds the cluster- and namespace-level RBAC it needs to read the CRD and sync the objects, and if a synced object creates other resources on the control plane cluster (for example, a Secret), vCluster detects them and syncs them back into the tenant cluster.
You’ll need:
Check your tooling:
kubectl version --client
vcluster version
istioctl version --remote=false
Custom resource sync (and the patching you’ll use in Part 2) requires the tenant cluster to be connected to vCluster Platform, either self-hosted or the hosted vCluster Cloud offering. The free tier is sufficient, there’s no license key to manage.
If you skip this, the syncer typically crash-loops with an error like:
you are trying to use a vCluster pro feature 'Generic Sync' ... not available in the open source vcluster
💡 Note for Part 2: Part 1 runs entirely on the free tier. Part 2 turns on vCluster's Istio integration, which is a Pro feature and needs a vCluster Platform licensed for it. Customers normally have this enabled by the vCluster team through the backend, so there's usually nothing to install yourself; just confirm your Platform is licensed for the Istio integration before starting Part 2.
vCluster Standalone runs vCluster's own Kubernetes control plane directly on a Linux node, with no underlying host cluster. SSH into your node, become root, and create the config directory:
sudo su -
mkdir -p /etc/vcluster
Standalone needs a higher inotify watch limit than the default:
sysctl -w fs.inotify.max_user_watches=524288
Optionally pin a Kubernetes version:
cat <<EOF > /etc/vcluster/vcluster.yaml
controlPlane:
  distro:
    k8s:
      version: v1.34.0
EOF
Install the control plane:
curl -sfL https://github.com/loft-sh/vcluster/releases/download/v0.35.1/install-standalone.sh | sh -s -- --vcluster-name standalone
vCluster writes a kubeconfig to /var/lib/vcluster/kubeconfig.yaml and installs a CLI at /var/lib/vcluster/bin/vcluster-cli. Point kubectl at the control plane and confirm the node is Ready:
export KUBECONFIG=/var/lib/vcluster/kubeconfig.yaml
kubectl get nodes
To drive the cluster from your laptop instead, copy /var/lib/vcluster/kubeconfig.yaml locally and change its server field to the node's public IP.
For Part 1, the minimal profile is enough. The important side effect is that installing Istio registers all Istio CRDs on the control plane cluster (including the security.istio.io CRDs):
istioctl install --set profile=minimal -y
With KUBECONFIG still pointed at the Standalone control plane, verify the security CRDs exist:
kubectl get crd | grep security.istio.io
Expected output:
authorizationpolicies.security.istio.io     2026-06-01T...
peerauthentications.security.istio.io       2026-06-01T...
requestauthentications.security.istio.io    2026-06-01T...
These exist on the control plane cluster. The tenant cluster won’t have them unless you sync them.
Custom resource sync needs a Platform connection. You have two options.
Option A: vCluster Cloud (hosted). vCluster Labs runs the Platform for you while your control plane and tenant clusters stay in your own infrastructure. Sign up for the free tier at vcluster.cloud, then log your CLI in with the URL your organization is given:
vcluster platform login https://your-org.vcluster.cloud
Option B: self-hosted Platform. Start Platform on the Standalone control plane instead:
vcluster platform start
This prints a *.loft.host URL and logs your CLI in. Whichever option you choose, the Platform endpoint must be reachable from the control plane cluster, because the tenant syncer runs inside it (a localhost port-forward on your laptop won’t work for the syncer).
Confirm your CLI is logged in:
vcluster platform get current-user
If you later see:
platform access key not found. Please login again
just re-run the login command.
Create a tenant cluster named tenant in the team-x namespace:
vcluster create tenant --namespace team-x
The CLI will connect you to the tenant cluster and switch your kubectl context to it. Since you're connecting through a port-forward, this command keeps running in the foreground; leave it open and run the following commands in a second terminal. (If you're scripting this instead, add --connect=false and run tenant commands as one-shots with vcluster connect tenant -n team-x -- kubectl ....)
Verify the tenant cluster has no Istio security CRDs:
kubectl get crd | grep security.istio.io
Expected output:
No resources found
Create authz-policy.yaml:
apiVersion: security.istio.io/v1
kind: AuthorizationPolicy
metadata:
  name: httpbin-allow
  namespace: default
spec:
  selector:
    matchLabels:
      app: httpbin
  action: ALLOW
  rules:
    - from:
        - source:
            namespaces: ["default"]
Apply it inside the tenant cluster:
kubectl apply -f authz-policy.yaml
Expected output:
error: resource mapping not found for name: "httpbin-allow" namespace: "default"
from "authz-policy.yaml": no matches for kind "AuthorizationPolicy" in version "security.istio.io/v1"
ensure CRDs are installed first
That’s the core problem: the tenant API server doesn’t know the AuthorizationPolicy kind yet.
Create vcluster.yaml:
sync:
  toHost:
    customResources:
      authorizationpolicies.security.istio.io/v1:
        enabled: true
        scope: Namespaced
This:
Why the /v1 suffix? Istio registers this CRD with two versions, and its storage version is v1beta1. Without a pinned version, vCluster copies only the storage version into the tenant cluster, so applying a security.istio.io/v1 policy would still fail with "no matches for kind". Pinning /v1 makes the tenant cluster serve the version the policy uses.
A quick note on scope: custom resource sync currently supports namespace-scoped resources only. If you omit scope, vCluster defaults to Namespaced.
After vcluster create, your context is the tenant cluster. If you try to upgrade from there, you may get prompted about creating a tenant cluster inside another tenant cluster.
Switch back to the Standalone control plane context first, then upgrade:
vcluster disconnect
vcluster create tenant --namespace team-x --values vcluster.yaml --upgrade
If you see an error about not being logged in (despite having Platform running), don’t work around it, re-run the Platform login from Step 3 so the cluster registers properly.
The CLI reconnects you to the tenant cluster when the upgrade finishes. The CRD takes a few seconds to be copied down and become ready, so wait for it explicitly:
kubectl wait --for condition=established --timeout=60s \
  crd/authorizationpolicies.security.istio.io
Expected output:
customresourcedefinition.apiextensions.k8s.io/authorizationpolicies.security.istio.io condition met
If the kubectl wait reports the CRD doesn't exist yet, give it a few more seconds and re-run it. Even after the CRD is established, the API server's discovery cache can lag by a couple of seconds; if the next apply still says "no matches for kind", just retry it.
Now apply the same policy again:
kubectl apply -f authz-policy.yaml
Expected output:
authorizationpolicy.security.istio.io/httpbin-allow created
Confirm it exists in the tenant cluster:
kubectl get authorizationpolicy -n default
Expected output:
NAME            AGE
httpbin-allow   10s
Now switch back to the control plane cluster and find the synced object in the tenant’s namespace:
vcluster disconnect
kubectl describe authorizationpolicy -n team-x
Expected output (trimmed):
Name:         v2ck5gn05koj6c
Namespace:    team-x
Annotations:  vcluster.loft.sh/object-name: httpbin-allow
              vcluster.loft.sh/object-namespace: default
Spec:
  Action:  ALLOW
  Rules:
    From:
      Source:
        Namespaces:
          default
  Selector:
    Match Labels:
      App:  httpbin
Two details matter here:
That second point is the cliffhanger for Part 2.
Nothing about this setup is Istio-specific. You can sync any namespace-scoped CRD the same way:
sync:
  toHost:
    customResources:
      <plural>.<group>:         # the CRD name
        enabled: true
        scope: Namespaced       # only Namespaced is currently supported
To find the correct key, look at the control plane cluster’s CRDs (from the control plane context):
kubectl get crd | grep <your-tool>
Whatever it prints (e.g. certificates.cert-manager.io) is exactly what you use under customResources.
If a CRD defines multiple versions, vCluster uses the storage version by default. You can pin a specific one by appending it to the key as <plural>.<group>/<version> exactly why the AuthorizationPolicy key in Step 6 pins /v1.
A few examples:
Two rules always apply:
If your resource references other objects by name (a Secret, a Service, a namespace), those references cross the boundary untranslated by default. vCluster supports reference patches and expression patches to rewrite them during sync, exactly the tool you’ll reach for in Part 2.
If you want Istio AuthorizationPolicy (and other security.istio.io resources) to work inside tenant clusters, enable custom resource sync for the relevant CRDs. That makes the kinds available in the tenant cluster and syncs the resulting objects to the control plane cluster where Istio runs.
Your policy synced, but it still says “allow from namespace default”. On the control plane cluster, your tenant workloads actually live in team-x. In Part 2 you’ll turn on enforcement and see how this mismatch produces a surprising deny, then fix it with a small sync patch (no hand-editing translated names).
vcluster delete tenant --namespace team-x
Then tear down the Standalone control plane by deleting the node or VM you provisioned for it (for example, terraform destroy if you created it with Terraform).
Deploy your first virtual cluster today.
